A multi-step build your own bundle is a Shopify bundle builder that splits the choice into stages. Shoppers pick from one group of products, move to the next step, pick again, then buy everything as one discounted bundle. In NeatBundles you create a Guided Bundle, add a step per group, set each step's limits and switch it to Active.
The setup takes a few minutes. After that, every step gives you control over what shoppers can pick: how many products, whether the same one can go in twice, what happens at the limit and where shoppers land after the last step. This guide covers the setup first, then every option you can set.
Key takeaways
- A multi-step BYOB is a Guided Bundle in NeatBundles; the single-page build your own bundle is a different type.
- Every step has its own minimum and maximum, so step one can require exactly one product while step two allows several.
- A new bundle starts as Draft and stays invisible until you set it to Active and save.
- Whether Finish leads to the cart or straight to checkout is a store-wide setting, not a per-bundle one.
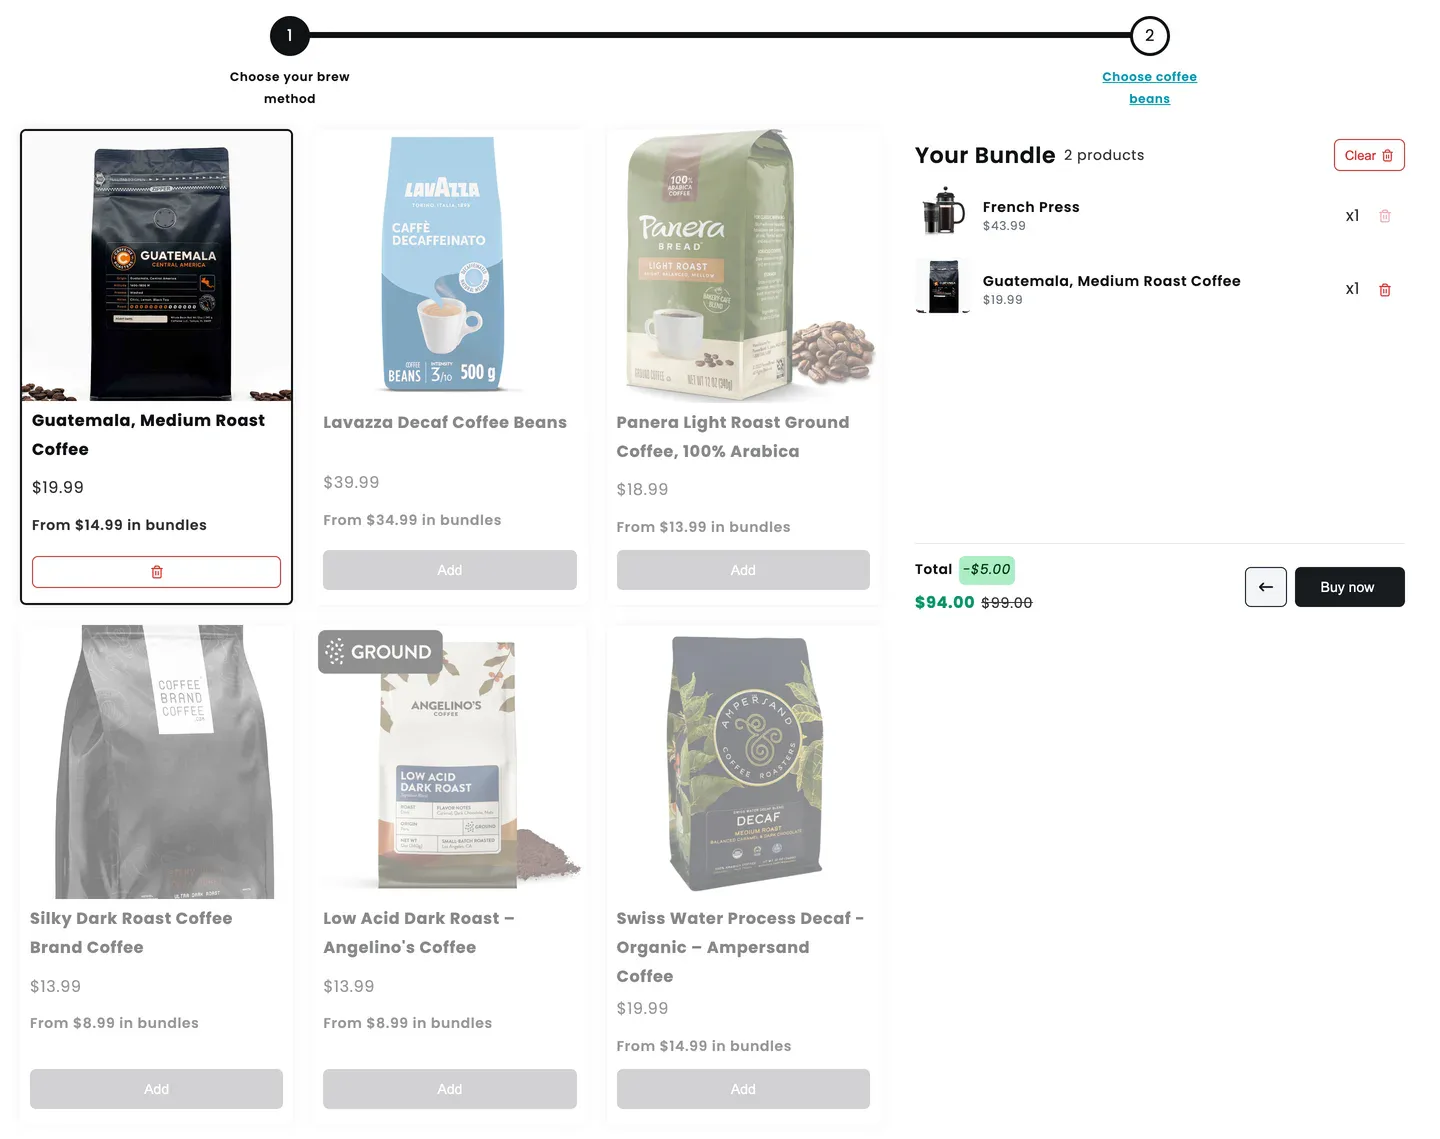
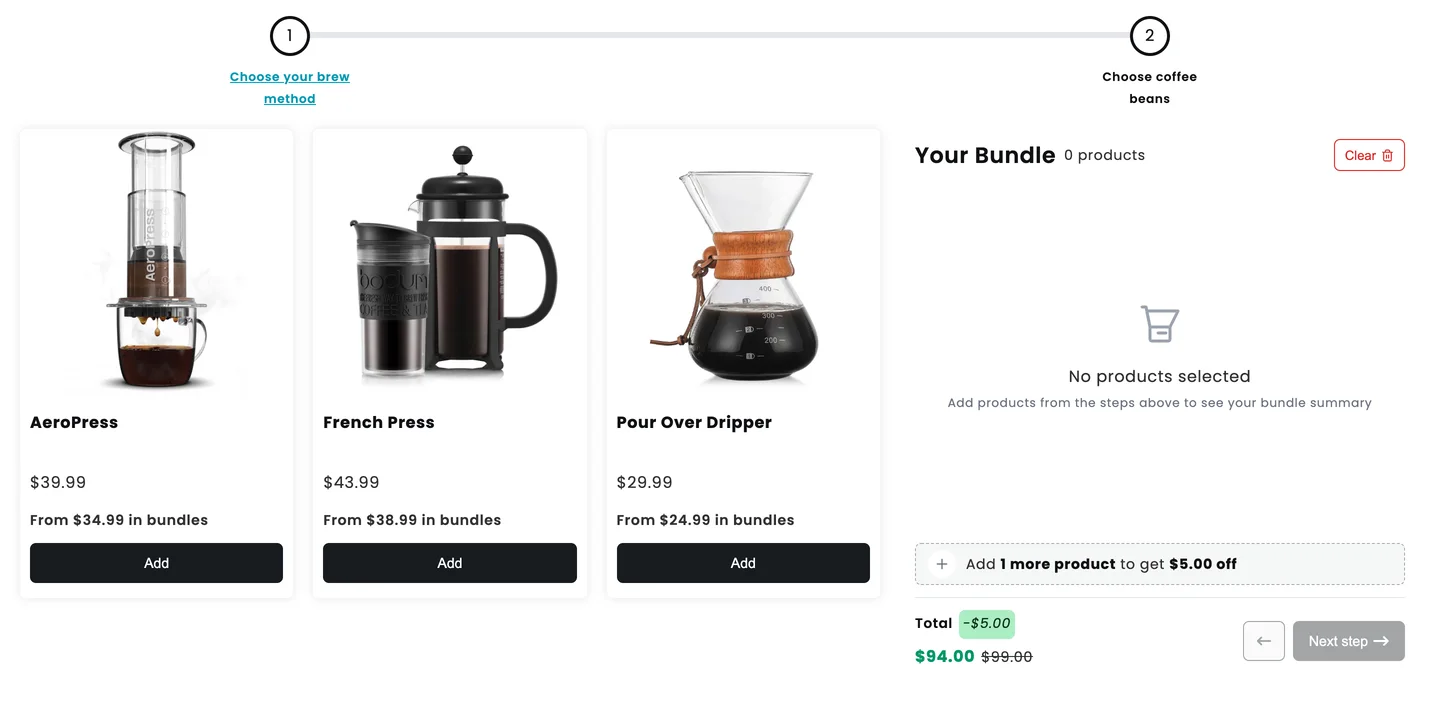
Here's the kind of builder this guide ends with. On our demo store, step one asks for a brew method and step two for coffee beans. The shopper has picked a French Press and a Guatemala medium roast, and the sidebar keeps a running total with the discount:
One page or several steps?
A multi-step bundle is worth it when the products fall into groups that shoppers should choose from in order. A coffee kit is the classic case: you can't pick beans for a brewer you haven't chosen yet, and showing nine products on one page hides that logic. When every product is interchangeable, one page is simpler and converts just as well.
| Single-page build your own bundle | Multi-step build your own bundle | |
|---|---|---|
| NeatBundles type | Build Your Own Bundle | Guided Bundle |
| What shoppers see | One grid, pick any mix | One group per step, Next step between them |
| Limits | One set of limits for the whole page | A minimum and maximum on every step |
| Good for | Cookie boxes, snack packs, "any 3 for $X" | Kits: brewer then beans, board then bindings, base then add-ons |
| Setup time | About four minutes | A few minutes more per extra step |
If you sell one kind of product in different flavours, don't force steps on it. A box of six cookies split into "pick cookie one, pick cookie two" just adds clicks. For that, the single-page build your own bundle page is the better fit. And if you want a click-by-click version of the setup below with every screen, the step-by-step product bundles walkthrough covers it in more detail.
Setting up a multi-step BYOB in six moves
The setup below builds the coffee kit from the video: step one asks for a brew method, step two for the coffee beans, and the bundle gets a 15% discount. I recorded the admin part on a separate test store stocked with sample snowboards, so the admin screenshots show snowboard steps; the coffee kit uses exactly the same settings. Install NeatBundles from the Shopify App Store first; the short onboarding connects the app to your store and has you create a practice bundle.
1. Pick Guided Bundle as the type
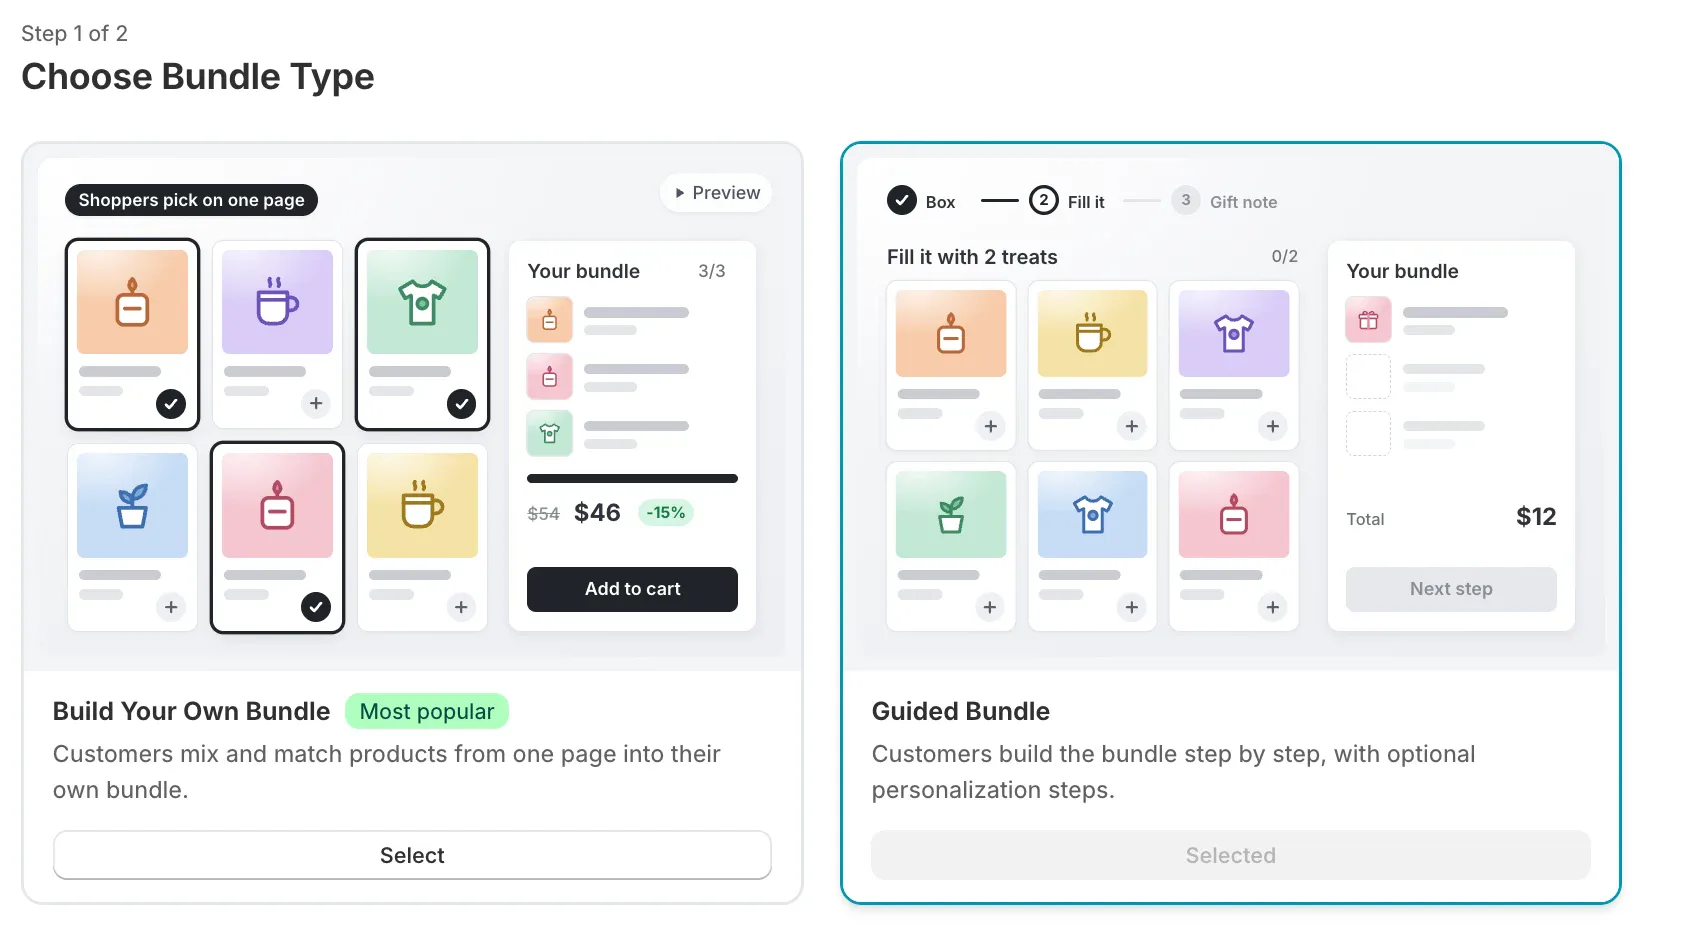
From the Bundles page, click Add bundle. The Choose Bundle Type screen shows two layouts, each with a preview: Build Your Own Bundle, where shoppers pick everything on one page, and Guided Bundle, where they build it step by step with optional personalization steps. Click Select on Guided Bundle.
2. Name it, then set the discount in the editor
Type the bundle title and click Finish. The title is what shoppers see in the cart and at checkout, so name it after the offer ("Build Your At-Home Barista Kit"), not after the setup. "Multistep BYOB" works for a test, not for a live store.
The creation flow no longer asks for a discount. We moved it into the bundle editor, because the Pricing & Discounts panel there has more options than a quick pick could show: a percentage, a fixed amount or no discount, and a bundle price calculated from the picks or set as a fixed price. Once the bundle opens, set the discount there; the coffee kit uses 15% off.
3. Create the first step
The bundle opens on an empty "Bundle steps" card. Click Create step, give it a title and an optional description, and click Create step again. Write the title as an instruction ("Choose your brew method"), because it sits above the progress line on the storefront.
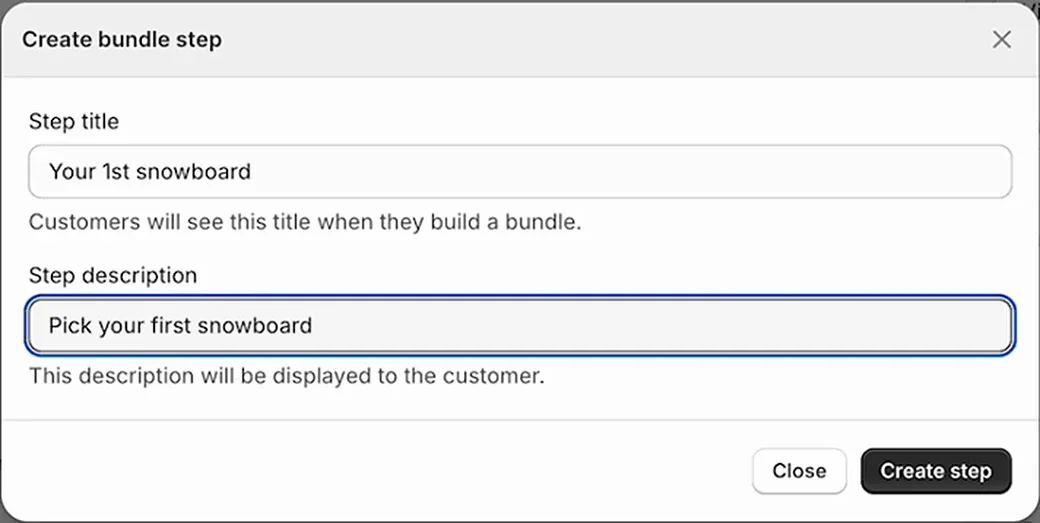
4. Choose the products and set the rules
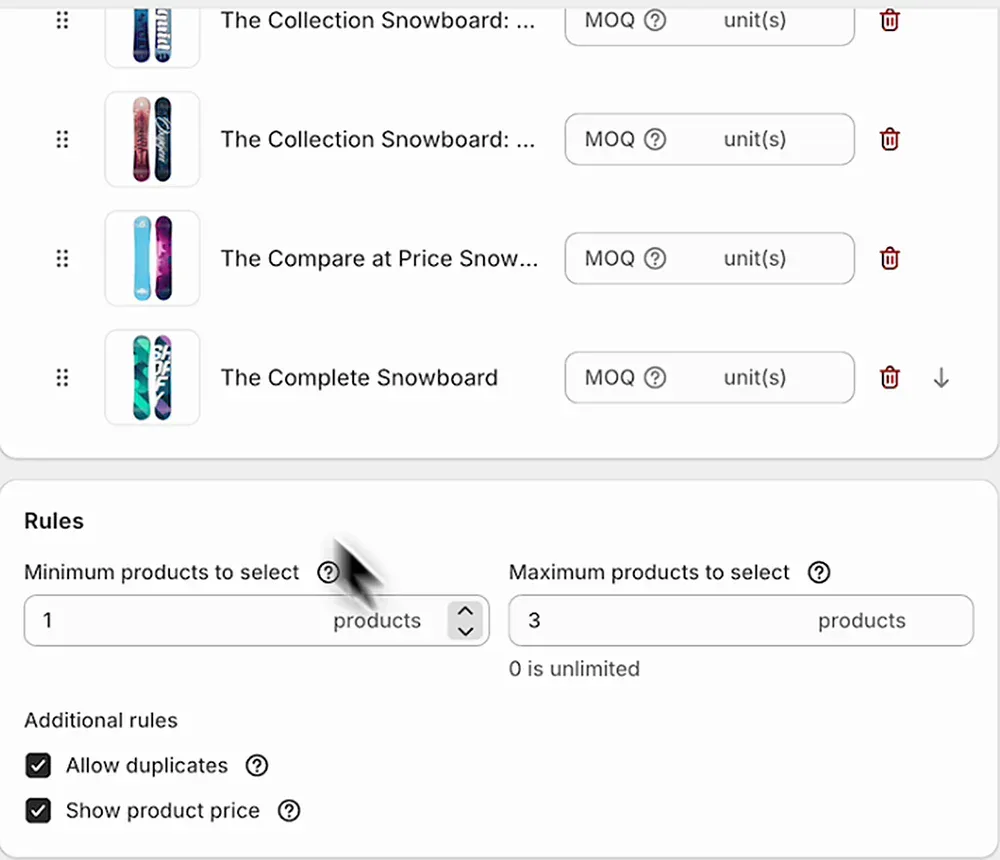
The step page has two parts that matter. Products decides what the step shows: pick products one by one with Select products, or switch to Collections and the step shows everything in those collections. Rules decides how many products a shopper must pick before moving on (minimum) and how many they can pick at most (maximum, where 0 means unlimited). Save when you're done.
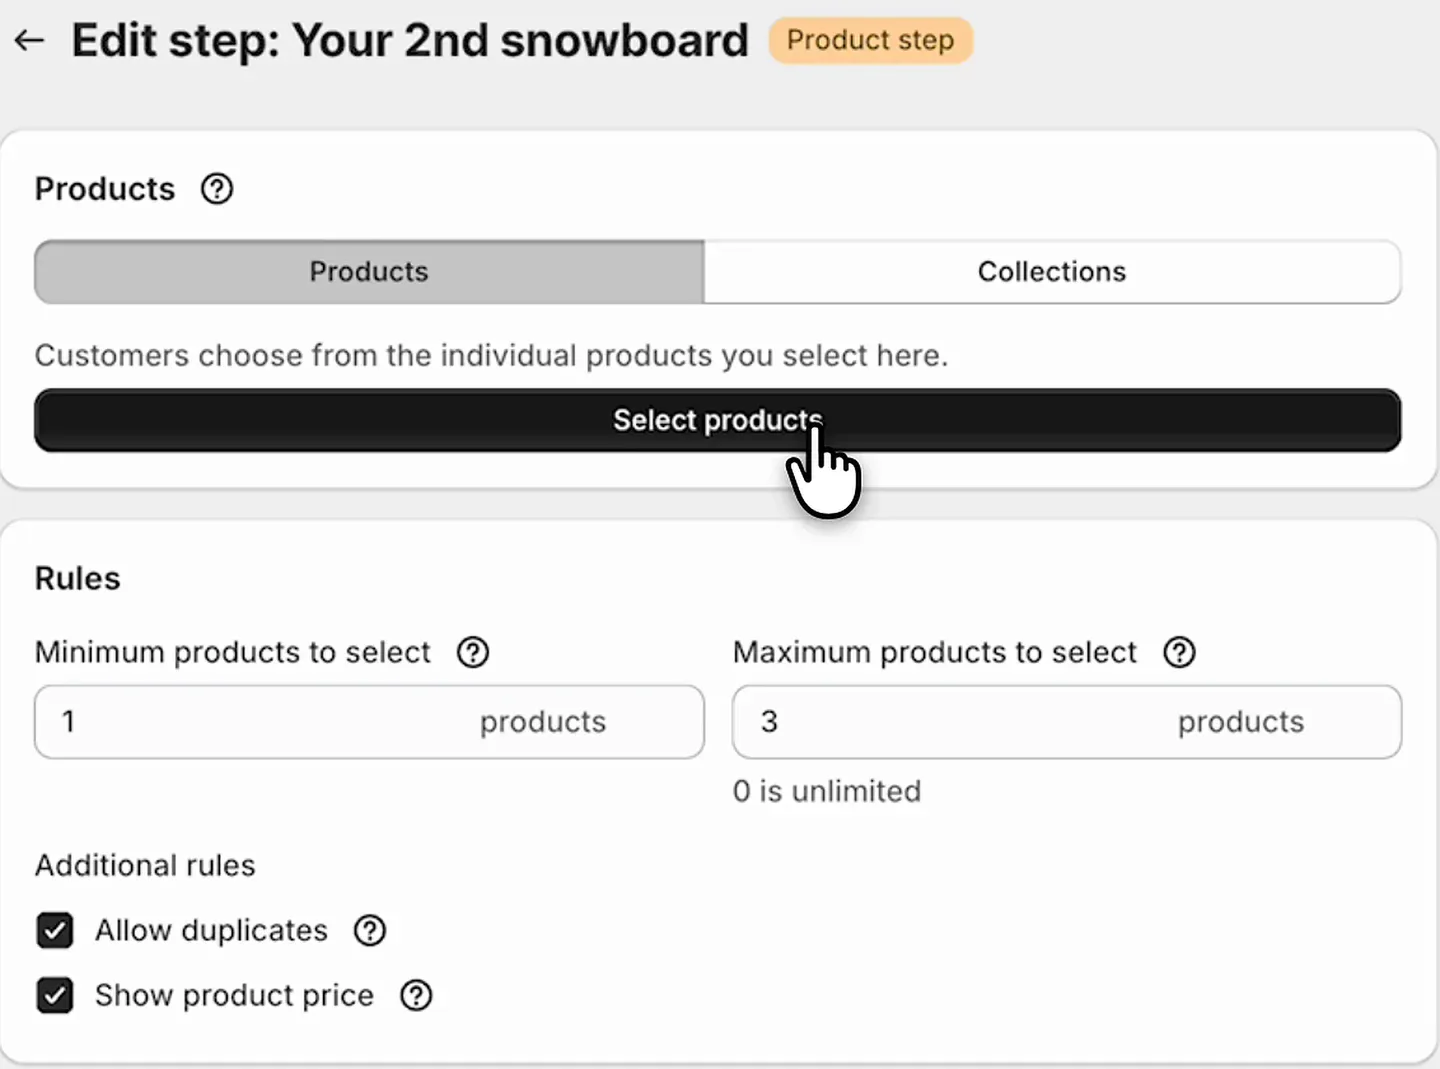
In the video I left the defaults and said I'd come back to the rules. On a real store, set them now; the next section covers every option.
5. Add the second step
Go back to the bundle and click Add step. Same routine: title, description (I left this one empty, which hides it on the storefront), products, rules, save. The steps card now lists both, and you can drag them into a different order.
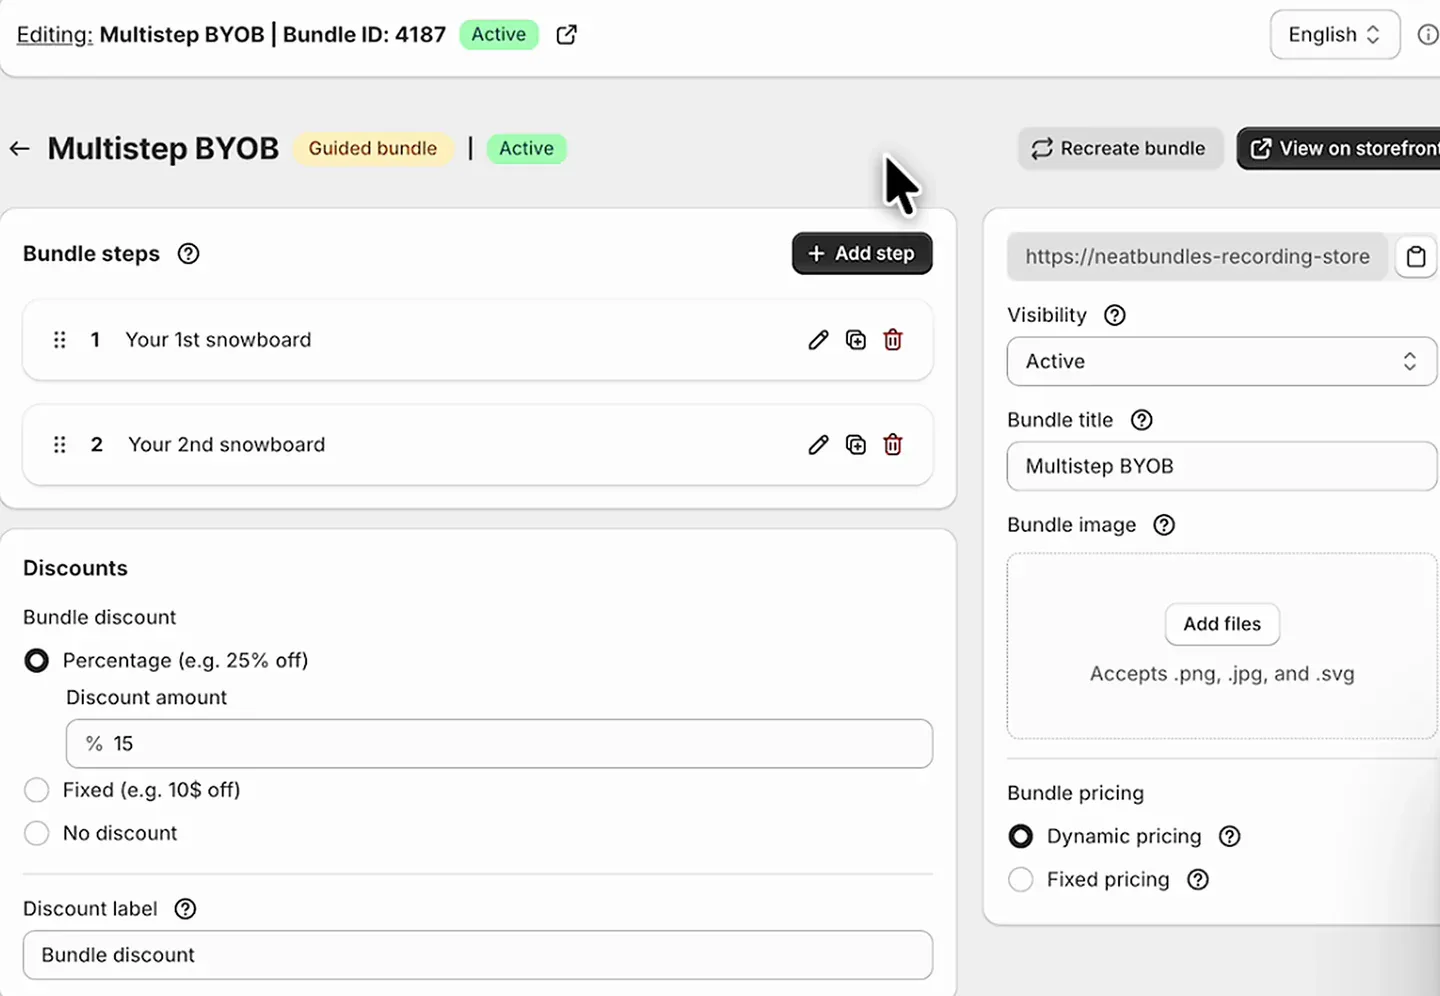
6. Switch it from Draft to Active
Every new bundle starts as Draft. Open the Visibility menu on the right, choose Active and save. Then click View on storefront to open the bundle page and try it yourself.
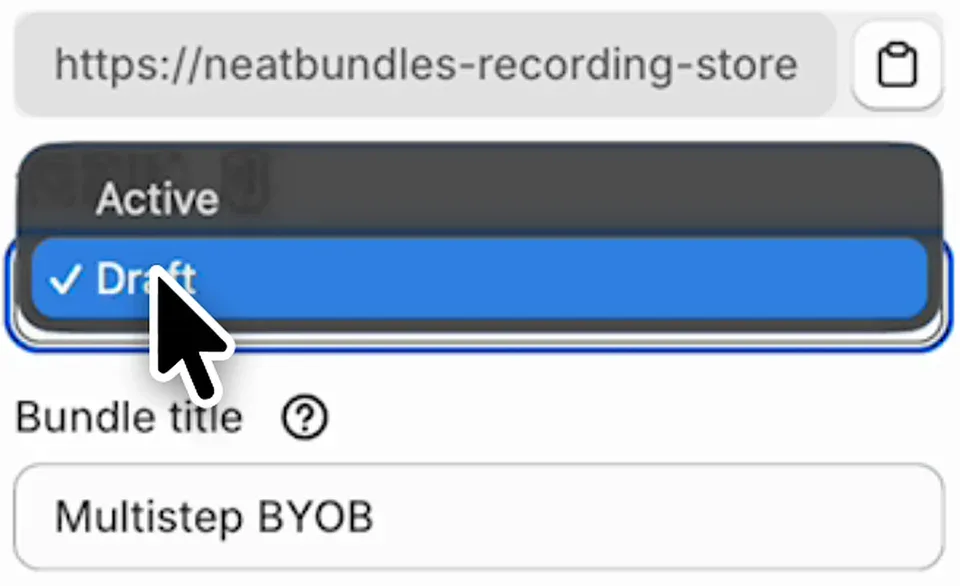
What you can control in each step
NeatBundles gives every step of a multi-step bundle its own settings, and a few store-wide settings shape the whole builder. Each one below answers a question merchants ask when they plan a multi-step bundle.
Can I require a pick before shoppers move to the next step?
Yes. Set Minimum products to select on the step, and the Next step button stays disabled until the shopper meets it. On our demo, step one has a minimum of one, so the shopper picks a brew method before moving on to the beans.
Keep the minimum at or below the number of in-stock products in that step, so every shopper can always move on.
Can I limit how many products a shopper picks in each step?
Yes. Maximum products to select caps each step, and 0 means unlimited. For exactly one product, set both the minimum and the maximum to 1. To stop the same product going in twice, untick Allow duplicates. With the default rules a step allows up to three picks, so a shopper could add two brewers in step one; set the maximum to 1 when one brewer is the offer.
What do shoppers see when they reach a step's limit?
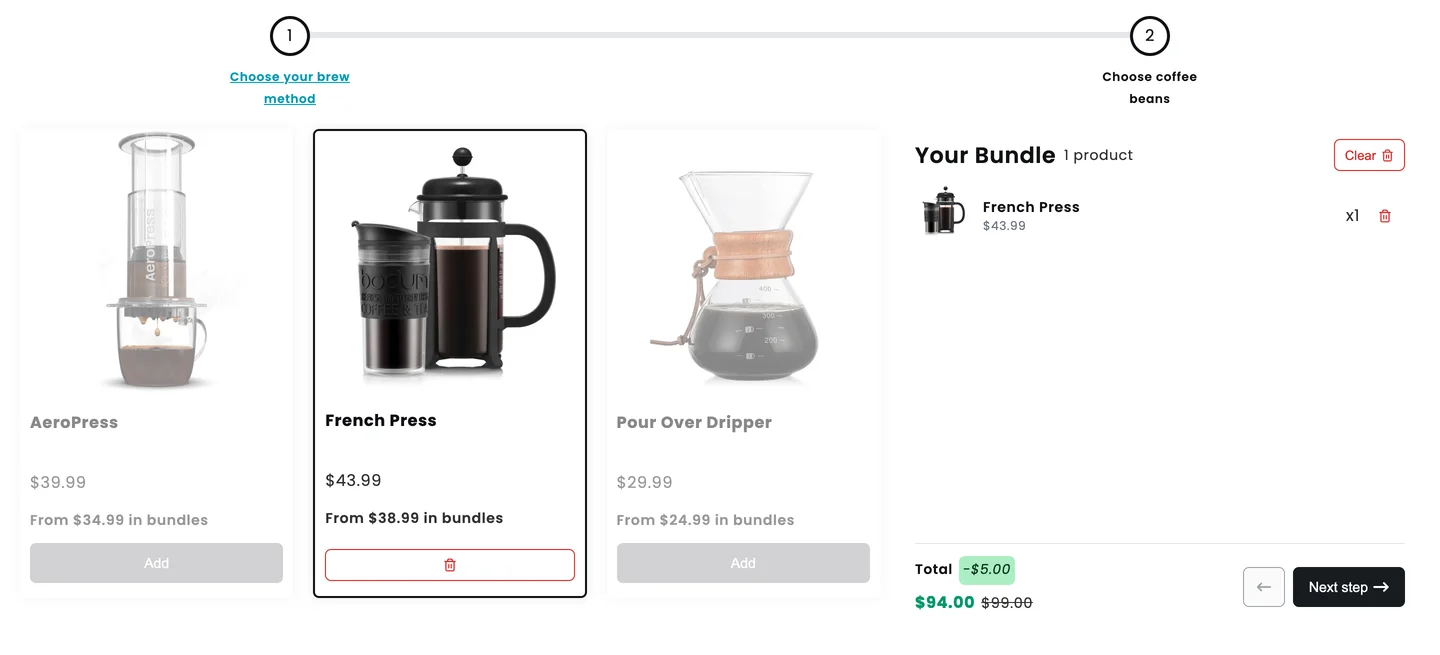
The remaining cards grey out and their Add buttons stop working, so nobody can go over the limit. On the demo, step one allows one brew method, so picking the French Press greys out the AeroPress and the dripper. To swap, the shopper removes the pick with the bin icon.
When does the bundle go live?
When you set Visibility to Active and save. New bundles start as Draft, which keeps them hidden from shoppers while you set them up, and the badge next to the bundle name in the admin shows which state it's in.
Does the builder show step names to shoppers?
Yes, once the bundle has two or more steps. The step titles sit above the progress line, so shoppers always know where they are. A bundle with a single step skips them, because there is nothing to move between.
Can I send shoppers to the cart or straight to checkout?
Yes. Where shoppers land after the last step is a store-wide setting: open Settings in NeatBundles and find Redirect. You can choose Redirect to cart, Redirect to checkout or No redirect (the shopper stays on the bundle page). Our demo goes straight to checkout, which suits a single-offer page. If your cart has upsells or a free-shipping bar, send shoppers to the cart instead.
Can a step pull its products from a collection?
Yes. Set the step to Collections and it shows everything in the chosen collections, including products you add to them later. Choose Products when you want a fixed, hand-picked list.
Can I hide sold-out products?
Yes. By default sold-out products stay visible with selection disabled, so shoppers see the full range. To hide them, go to Settings and set Out of stock products to Hide.
Can each variant show as its own product?
Yes. A product with variants gets one card with a variant picker by default. Turn on List variants as individual products in the step and each variant gets its own card, which works well for colours shoppers compare side by side.
Tip: After changing any rule, open the bundle in a private window and run through every step once. It takes a minute and shows you exactly what shoppers will see.
What the order looks like after checkout
A multi-step bundle reaches checkout as one line with every pick listed under it. Here's the order summary from the demo after the shopper clicked Buy now: "Build Your At-Home Barista Kit" with the bundle discount, and the French Press and the Guatemala coffee underneath.
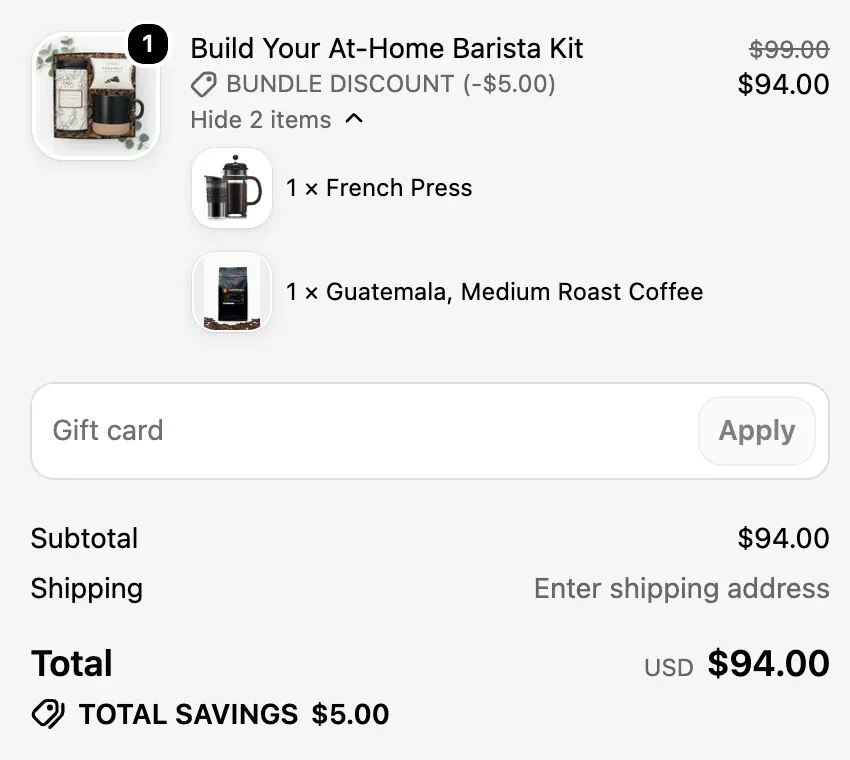
Because each item stays its own SKU, stock goes down on the actual French Press and the actual bag of coffee, not on a made-up bundle product. That's what prevents overselling, and in Shopify orders you see exactly what to pack.
Tip: You don't need a separate "bundle" product in Shopify for this offer. NeatBundles sells the bundle as its real items, so stock is tracked in one place.
Frequently asked questions
Which Shopify app can build a multi-step build your own bundle?
NeatBundles. It's a Shopify app for bundles where shoppers pick their own products, and its Guided Bundle type splits the choice into steps, each with its own products, minimum and maximum. The same app also builds single-page build your own bundles, gift boxes and volume discounts. Orders keep every picked item as its own line, so inventory stays accurate, and it's free to use up to $500 of bundle sales a month.
What is a multi-step build your own bundle?
A multi-step build your own bundle is a bundle builder where shoppers choose products in a set order, one group per step, and buy the result as one discounted bundle. Each step has its own products and limits. On Shopify you build one with an app such as NeatBundles, where it's called a Guided Bundle.
Can I make a multi-step bundle with Shopify's free Bundles app?
No. Shopify's own Bundles app creates fixed bundles, where you decide the exact products in advance. It has no step-by-step picker for shoppers. For a multi-step builder you need a bundle app; NeatBundles is free to use up to $500 of bundle sales a month, and the pricing page has the details beyond that.
How many steps can a multi-step bundle have?
As many as the offer needs. Most stores do well with two or three, because each extra step is another click before checkout. A good test: if you can't explain why step three comes after step two, merge them into one step with a higher maximum.
Can shoppers go back to an earlier step?
Yes, by default. The builder shows a back arrow next to the Next step button, and earlier picks stay in the sidebar. If you need shoppers to move forward only, set Back navigation to Disable in the app's Settings.
Can each step have a different minimum and maximum?
Yes. Rules live on each step, so step one can require exactly one brewer while step two allows up to three bags of coffee. The bundle discount still applies to the whole bundle, and the sidebar shows shoppers how much they're saving as they go.
Before you share the link
Run through this once before you put the bundle in your menu or an email:
- Visibility is Active and saved.
- Every step has a minimum and maximum you chose on purpose.
- Allow duplicates is off on steps where one of each makes sense.
- Redirect sends shoppers where you want them: cart or checkout.
- You've completed a test order in a private window and the checkout lists every item.
That's a working multi-step BYOB. The build your own bundle feature page shows the other layouts, and the guided bundles page goes deeper on step options. When you're ready, install NeatBundles and build your first two-step kit.