Shopify guided bundles are bundle pages that ask shoppers one question per step, such as "which brewer?" and then "which beans?", and add every pick to the cart as one discounted bundle. Shopify has no built-in guided bundle, so you add one with an app like NeatBundles: plan the steps, create a Guided Bundle, set rules per step, and publish.
Picture a shopper on a coffee store that sells three brewers and six coffees. They want to start brewing at home, but they don't know which beans suit a French press, and nine products on one page don't help them decide. A guided bundle breaks that into two easy questions. That is exactly the setup in my tutorial video, and it's the reason guided bundles work well for what I'd call complex offers: kits where the right second product depends on the first.
Most guides jump straight to the buttons. The buttons take five minutes. What decides whether the bundle sells is the plan behind it: which questions you ask, in what order, and how many picks each step allows. So this guide starts there, then shows the setup in NeatBundles and what the shopper sees all the way to checkout.
Key takeaways
- A guided bundle asks one question per step and sends every pick to the cart as a single discounted bundle.
- Plan the steps on paper first: one decision per step, the biggest decision first, and a minimum and maximum for each step.
- In NeatBundles you choose Guided Bundle, name it, add a step per question, set the discount in the editor, then switch it from Draft to Active.
- Each picked item stays its own product in the order, so Shopify inventory stays accurate.
What is a guided bundle on Shopify?
A guided bundle is a step-by-step bundle builder: the shopper sees one step at a time, each with its own products and its own rules, and moves on with a Next step button until the bundle is complete. A progress bar at the top shows where they are, and a "Your Bundle" panel keeps a running total with the discount.
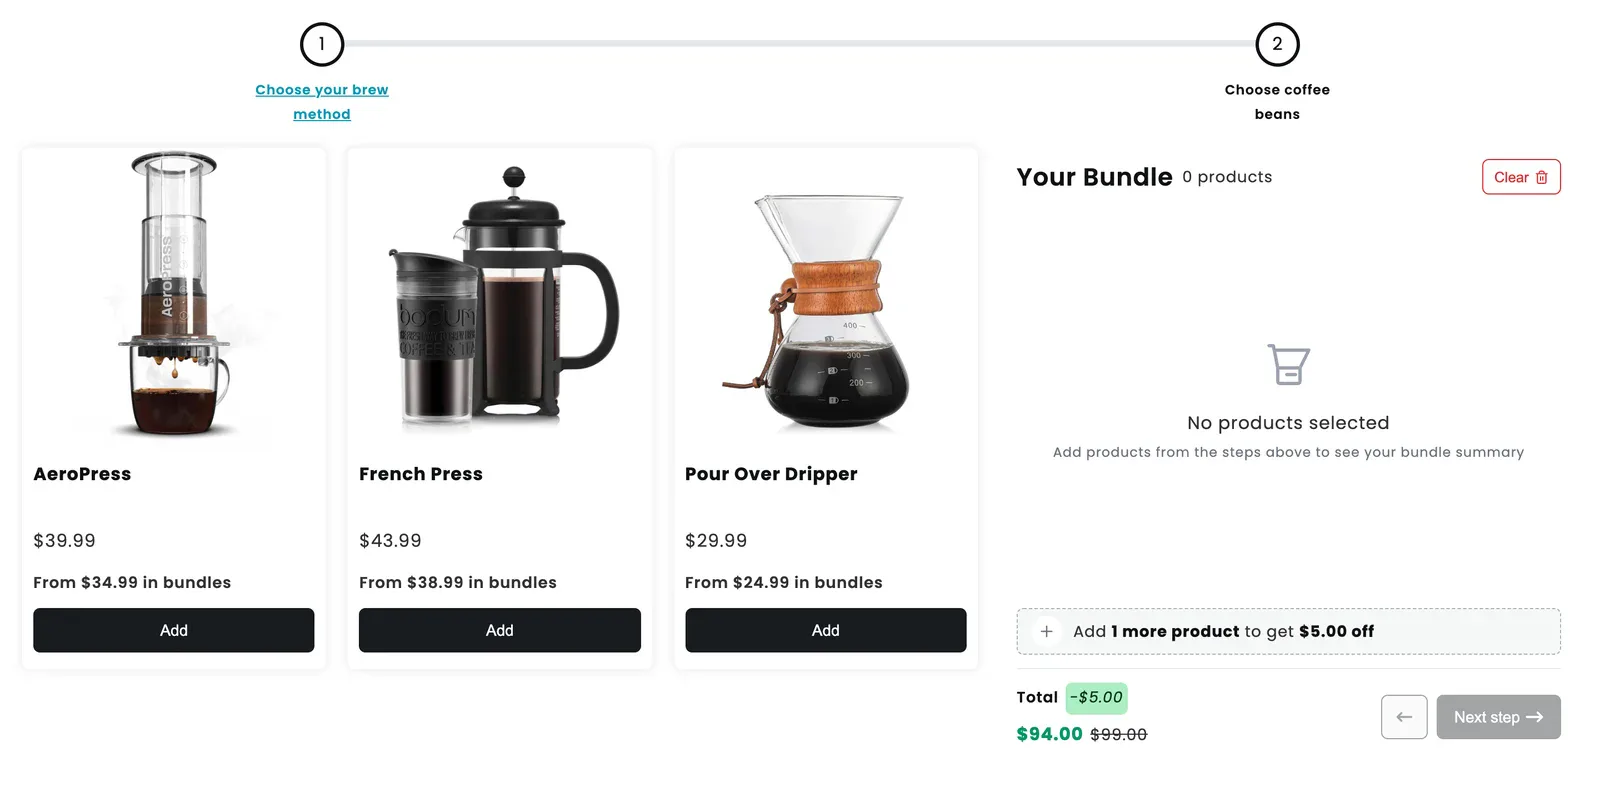
That is the live demo from the video. Step 1 asks for a brew method (AeroPress, French Press or Pour Over Dripper). Step 2 shows only coffee. The panel on the right even nudges the shopper: "Add 1 more product to get $5.00 off".
Here is how it compares with the two other bundle formats people usually consider:
| Guided bundle | Build your own bundle | Fixed bundle | |
|---|---|---|---|
| What the shopper does | Answers one question per step | Picks freely from one grid | Buys a set you chose |
| Rules | Min and max per step | Min and max for the whole box | None, contents are fixed |
| Best for | Kits where picks depend on each other | Same-category mixes (cookies, snacks) | One best-selling combo |
| On Shopify | Needs an app | Needs an app | Shopify's free Bundles app can do it |
If your offer is "any six cookies", a single-page builder is simpler; I covered that in how to build a build your own bundle page. A step-by-step flow earns its extra clicks when the order of the choices matters.
Turn your offer into questions first
The format works when every step answers one clear question the shopper already has in mind. Before you open any app, write the steps down as a short table: the question, the products that answer it, and how many picks are allowed.
This is the plan for the coffee kit from the video:
| Step | Question the shopper answers | Products in the step | Min | Max |
|---|---|---|---|---|
| 1 | How do you brew? | AeroPress, French Press, Pour Over Dripper | 1 | 1 |
| 2 | Which coffee goes with it? | Six coffees, from light roast to decaf | 1 | 1 |
A few rules of thumb I use when planning these:
- Put the decision that limits the others first. The brewer decides what coffee makes sense, so it goes before the beans. Asking for beans first would make shoppers guess.
- One decision per step. If a step asks "brewer and grinder?", shoppers stall. Split it into two steps instead. There is no fixed limit on how many steps you can add.
- Set the maximum on purpose. A max of 1 turns a step into a clear choice. A max of 3 turns it into "pick a few", which suits samplers. A max of 0 means unlimited.
- Keep the last step light. If you want a gift note or a name, NeatBundles adds an optional personalization step at the end, after the product steps.
The same table works for very different stores. A skincare routine can go cleanser, then serum, then moisturizer. A meal plan can go mains, then sides, then up to a few free snacks. A dance kit can ask for each garment in its own step with a size picker. You can see more set up this way in the bundle gallery.
Tip: In the video I suggest brainstorming the steps with ChatGPT before you configure anything. Here is a ready prompt for planning a guided bundle; replace the product list with yours.
Building the guided bundle in NeatBundles
With the plan written down, the setup in NeatBundles comes down to four short stages. If you want every single screen, including install and onboarding, my step-by-step product bundles walkthrough covers each one. Here I group them and focus on the settings that change how the bundle behaves.
1. Create the bundle and choose Guided Bundle
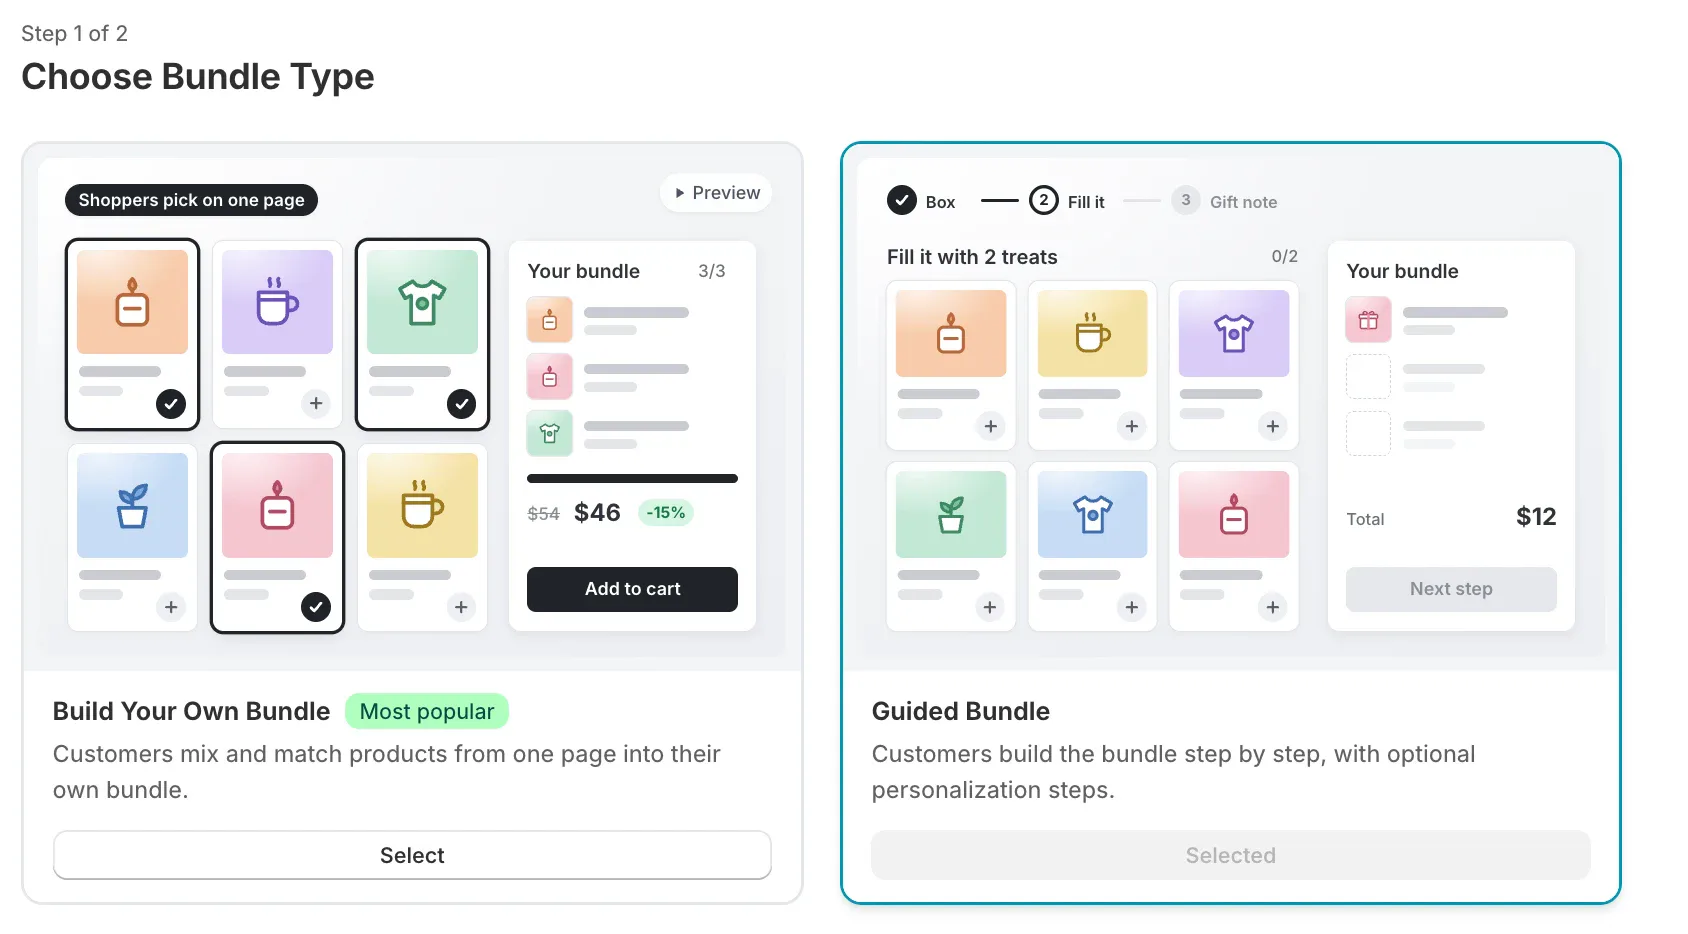
Choosing the bundle type first matters because it decides whether the page shows one grid or a sequence of steps. After installing NeatBundles and finishing the short onboarding, go to Bundles, click Add bundle, then click Select on the Guided Bundle card. The other card, Build Your Own Bundle, is the single-page layout. Preview on the Guided Bundle card plays a demo, if you want to see the format before committing.
2. Name it, then set the discount in the editor
The bundle name is what shoppers see in the cart and at checkout, so treat it as a product name, not an internal label. The video's kit is called "BYOB Barista Kit" in the admin; on the demo store today the same offer reaches checkout as "Build Your At-Home Barista Kit". Type the name and click Finish.
The creation flow no longer asks for a discount. We moved it into the bundle editor, because the Pricing & Discounts panel there has more options than a quick pick could show: a percentage, a fixed amount or no discount, and a bundle price calculated from the picks or set as a fixed price. The video uses 15% off; the demo store now runs this kit at a fixed $99.00 with $5.00 off.
3. Add one step per question
Every row of your plan becomes one step. Click Add step, enter the step title and an optional description (both are shown to the shopper), and click Create step. Write the title as the question, for example "Select your coffee method".
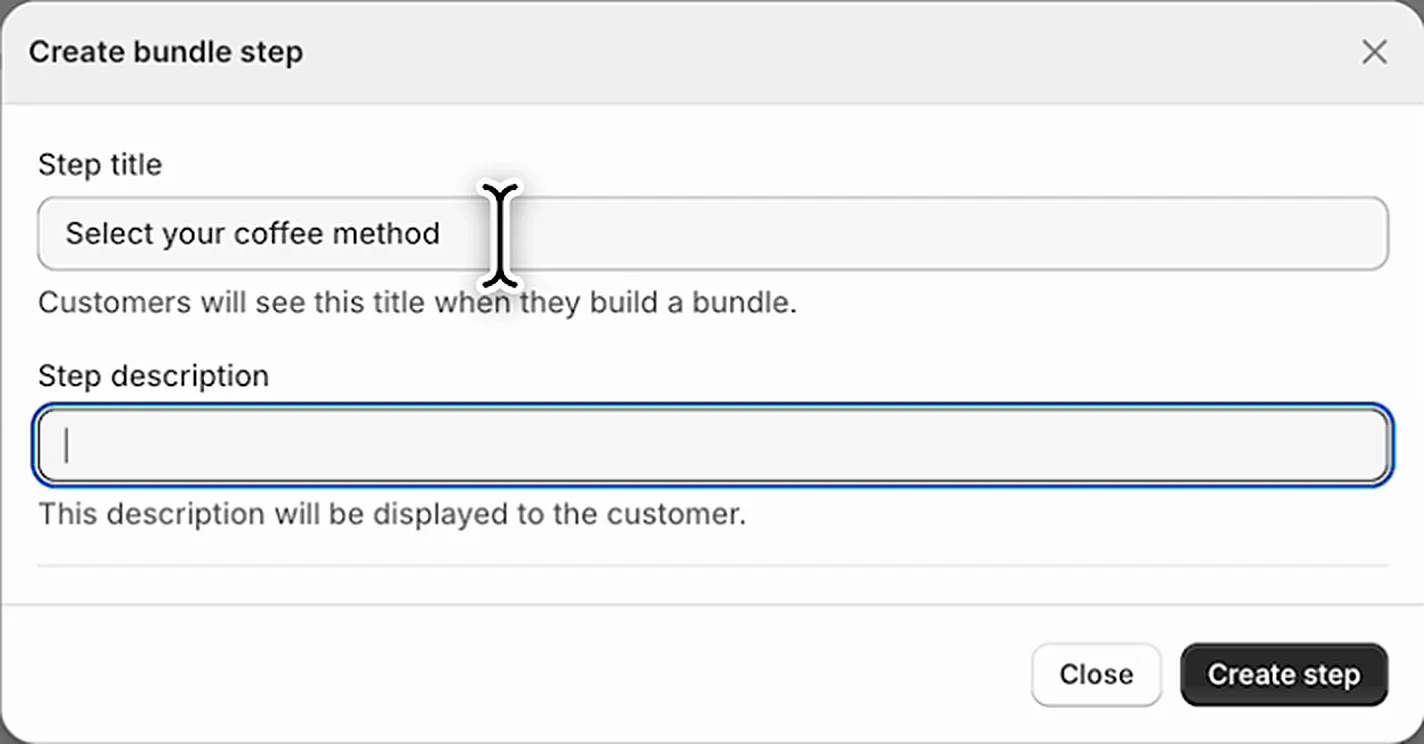
On the step page, choose what the step shows:
- Products lets you hand-pick items, which is what I did for the three brewers.
- Collections shows every product of a collection, handy when the step is "any coffee" and the range changes often.
- List variants as individual products shows each size or flavor as its own card instead of a dropdown.
Click Select after choosing products, then Save. Scroll down to the Rules section, which is where the plan's Min and Max columns go. The video's first step uses a minimum of 1 and a maximum of 3, and the help text notes that 0 is unlimited. Under Additional rules, "Allow duplicates" controls whether the same item can be picked twice, and "Show product price" controls whether prices appear on the cards. The step details panel also has "Hide total price" if you'd rather not show the running total on that step.
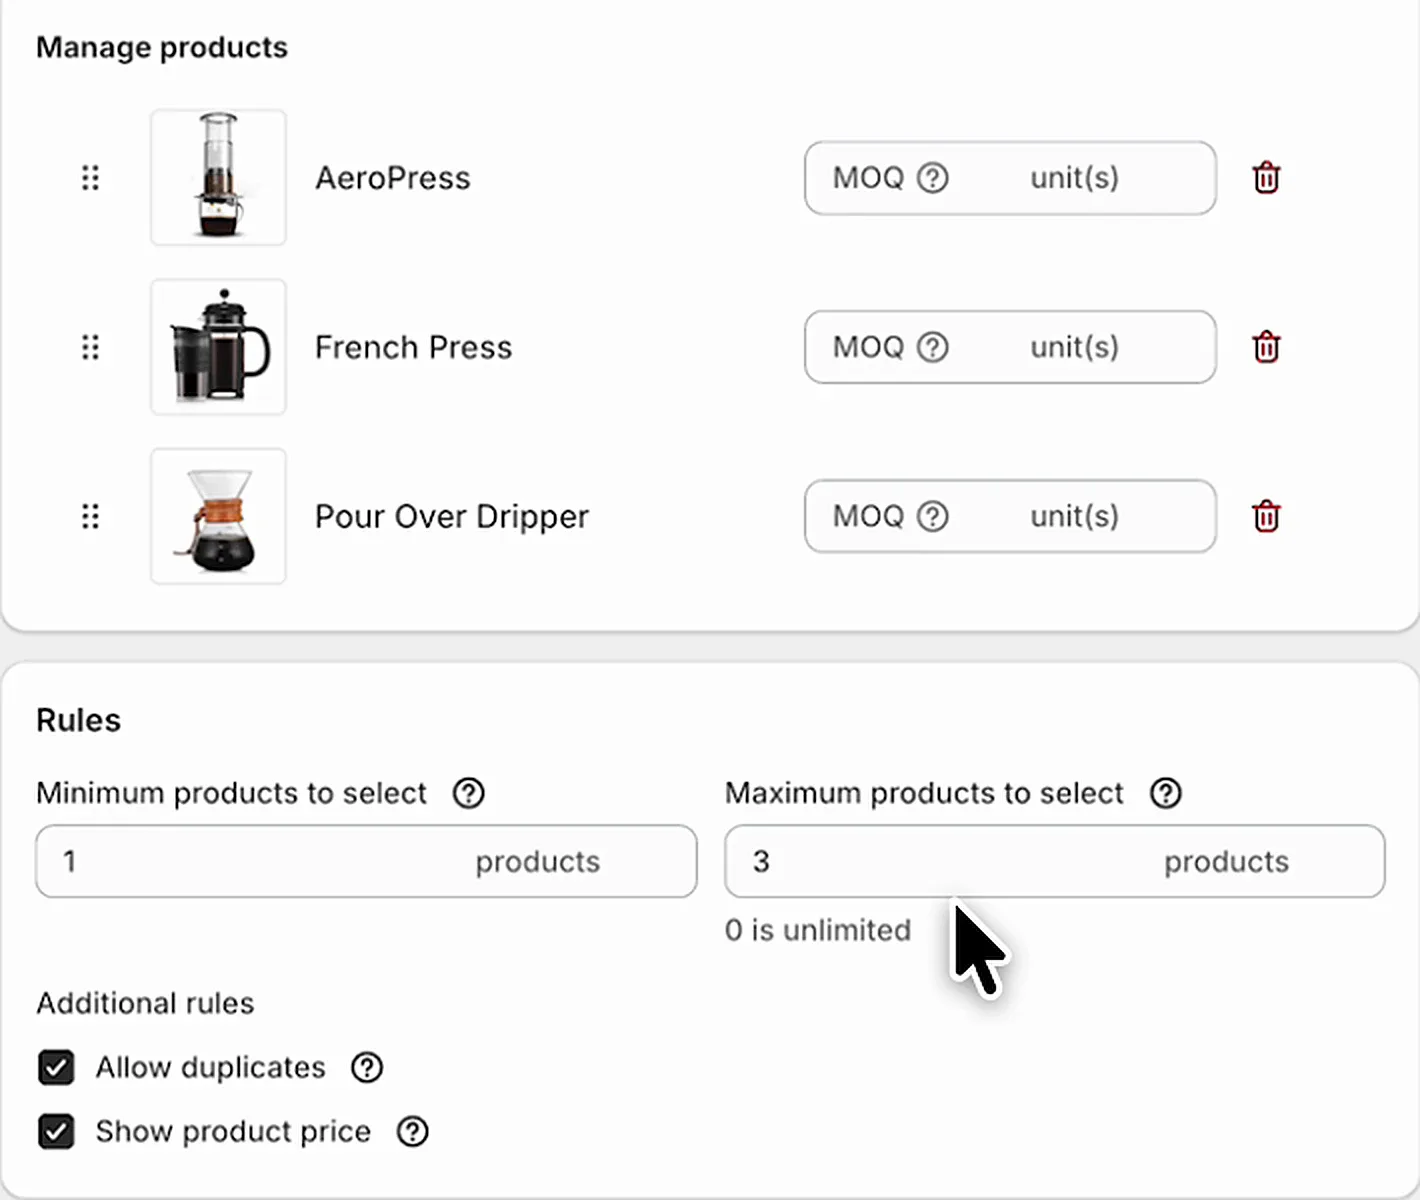
Go back and repeat for the next step. In the video, step 2 is "Pick your coffee" with the coffees selected individually.
4. Check the steps, then switch Draft to Active
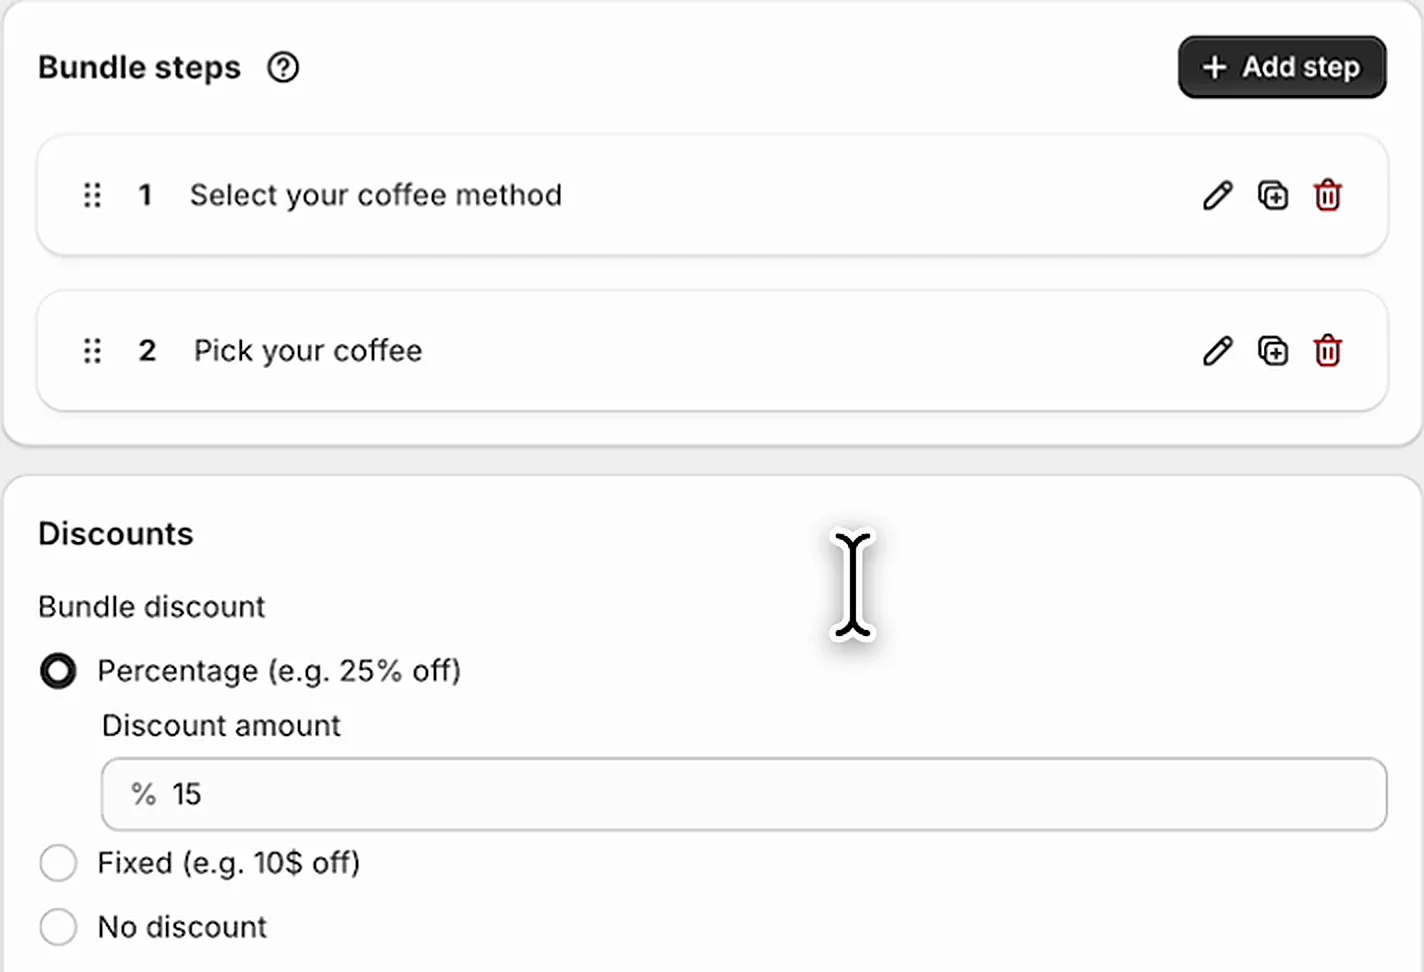
Back on the bundle page you should see both steps listed in order. Drag the handle to reorder them, use the pencil to edit and the copy icon to duplicate a step when the next one is similar. The Discounts card underneath is where you change the 15% later.
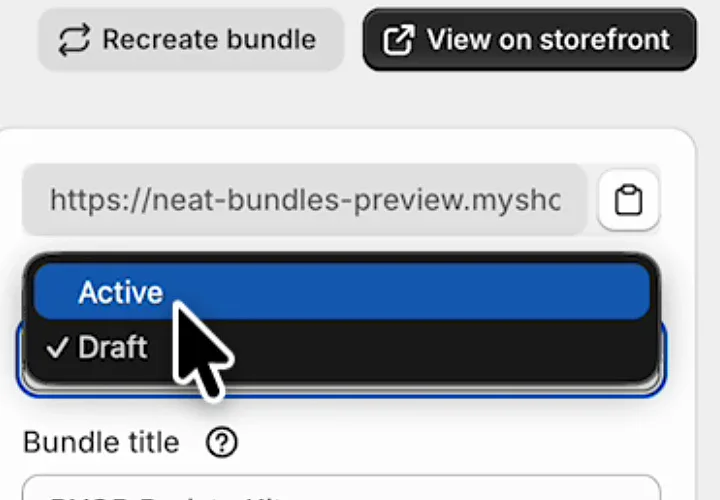
New bundles start as Draft, which means shoppers can't see them yet. Open Visibility, change it from Draft to Active, and click Save. Then click View on storefront to open the new bundle page.
What shoppers see, from first pick to checkout
The shopper's path is short: pick in step 1, click Next step, pick in step 2, click Buy now. The "Your Bundle" panel lists every pick with its price and shows the total next to the crossed-out original.
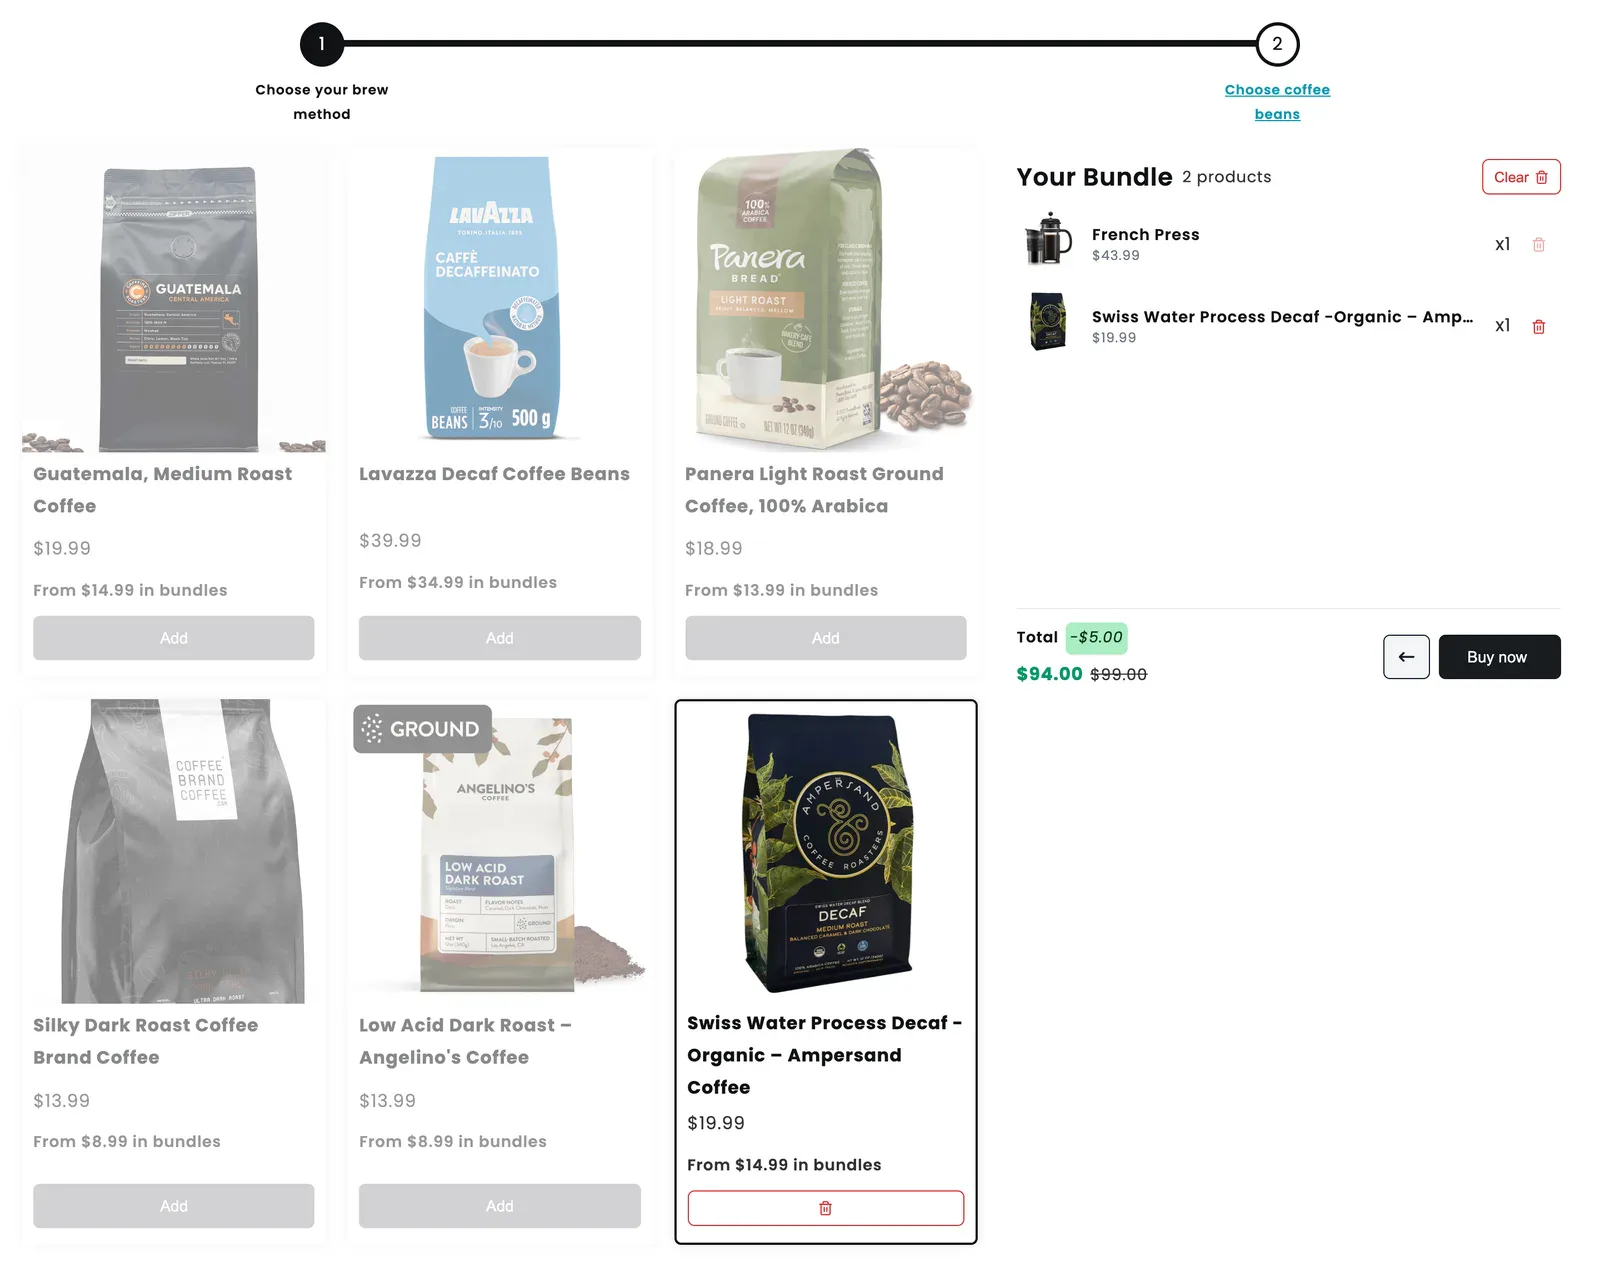
Two details worth noticing in that screenshot. Once the shopper has picked as many coffees as the step allows, the other cards grey out, so nobody ends up with a bundle that breaks your rules. And each card shows a "From $14.99 in bundles" line, which tells the shopper the bundle price before they commit. Sold-out items can't be picked either, because the builder checks inventory.
After Buy now, the shopper lands straight in checkout with one bundle line that lists every item under it:
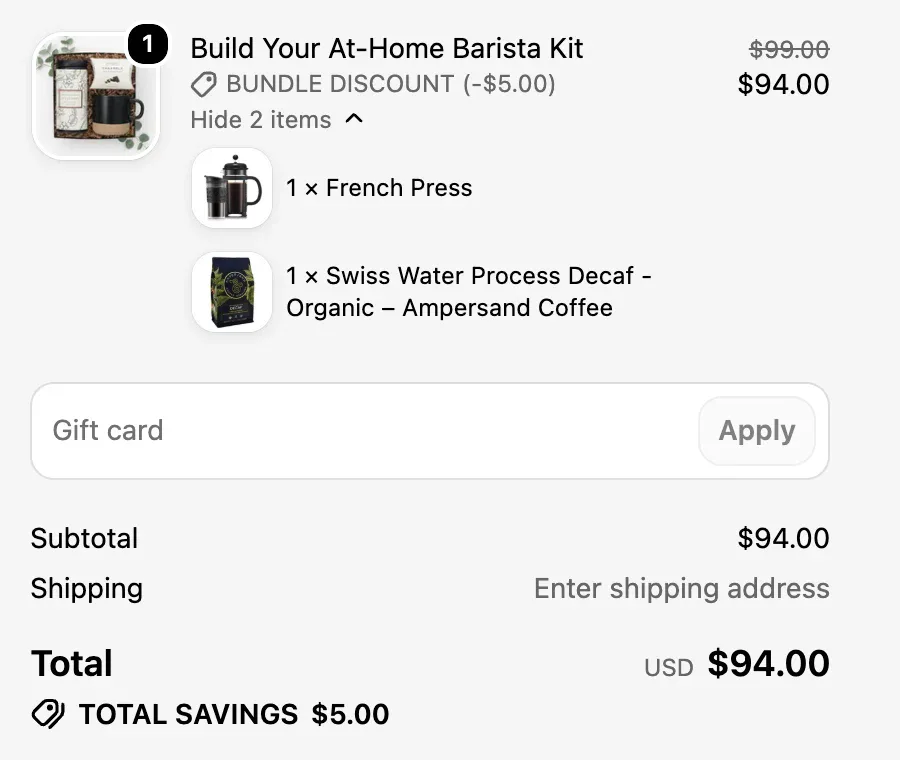
This is the part that saves you work later. In the video I point out that the order is broken down into the individual products, so inventory is tracked per item and stock stays accurate. When you pack the order, you see exactly which brewer and which coffee to send.
Guided bundle or another layout?
Steps help when each choice depends on the one before. When it doesn't, NeatBundles has a faster layout for the job:
- Picks don't depend on each other. "Any 6 cookies" or "3 candles for $45" works best as a single-page build your own bundle.
- Most buyers want the same set. Sell that set as a regular product, so shoppers check out in one click.
- The offer is "buy more of the same". Tiered discounts reward bigger quantities without steps.
- The kit is low-priced. Two or three steps suit a $25 gift set; longer flows fit high-value bundles like a full skincare routine.
Frequently asked questions
Does Shopify have guided bundles built in?
No. Shopify's free Bundles app creates fixed bundles and multipacks, where you choose the contents. A guided bundle, where shoppers pick products step by step, needs a bundle builder app such as NeatBundles. The app adds the step page to your theme and sends the finished bundle to the cart as one product.
How many steps can a guided bundle have?
There is no fixed limit in NeatBundles; a guided bundle can have as many steps as the offer needs, and the progress bar scrolls when the steps don't fit on screen. In practice two to five steps work best. Each extra step should answer a real question, or shoppers start dropping off.
Can shoppers pick more than one product in a step?
Yes. Every step has its own minimum and maximum, so one step can require exactly one brewer while the next allows up to three coffees. Shoppers can't move to the next step until the minimum is met, and "Allow duplicates" decides whether they can pick the same item twice.
How do guided bundles affect Shopify inventory?
Each picked product stays its own item in the order, so Shopify deducts stock from the actual French press and the actual coffee, not from a separate bundle product. Sold-out variants can't be picked in the builder, which keeps you from selling a bundle you can't ship.
How much does a guided bundle app cost?
NeatBundles is free to use up to $500 of bundle sales a month, with every feature included. Above that, the plan depends on your monthly bundle sales; the pricing page has the details.
Where to take it next
Once your first one is live, watch which step shoppers leave on and tighten that step's choices first. From there:
- Add a gift note or name step with personalized bundles.
- See every guided bundle option, including per-step rules and the personalization step, on the guided bundles feature page.
- Browse finished examples in the bundle gallery for step ideas in your niche.
Ready to try it on your own store? Install NeatBundles from the Shopify App Store and build your first guided bundle in a few minutes.