Step-by-step product bundles are bundle builders that walk shoppers through a short sequence of choices, one product category per step, and then add everything to the cart as a single discounted bundle. In Shopify you can build one without code using the NeatBundles app: create a guided bundle, add steps, pick products, set a discount and publish.
If you sell products that belong together, like a coffee brewer and the beans to go with it, a step-by-step bundle turns "I'll just buy the brewer" into "I'll take the whole kit". In this guide I'll show you exactly how I set one up on a real Shopify store, screen by screen, and what your customers see when they use it. The whole setup takes a few minutes.
Key takeaways
- A step-by-step bundle asks one question per step and adds every pick to the cart as one discounted bundle.
- Each product stays its own SKU, so Shopify inventory stays accurate and orders are easy to fulfil.
- In NeatBundles: choose Guided Bundle, name it, set a discount, add steps and products, then switch it from Draft to Active.
- NeatBundles is free to use up to $500 of bundle sales a month.
What are step-by-step product bundles?
A step-by-step product bundle is a bundle the customer builds in stages. Each step asks one question ("Which brewing method?", "Which coffee beans?"), shows only the products that answer it, and moves on once the shopper has picked. At the end, the selected products go to the cart together with the bundle discount applied. In NeatBundles this bundle type is called a guided bundle.
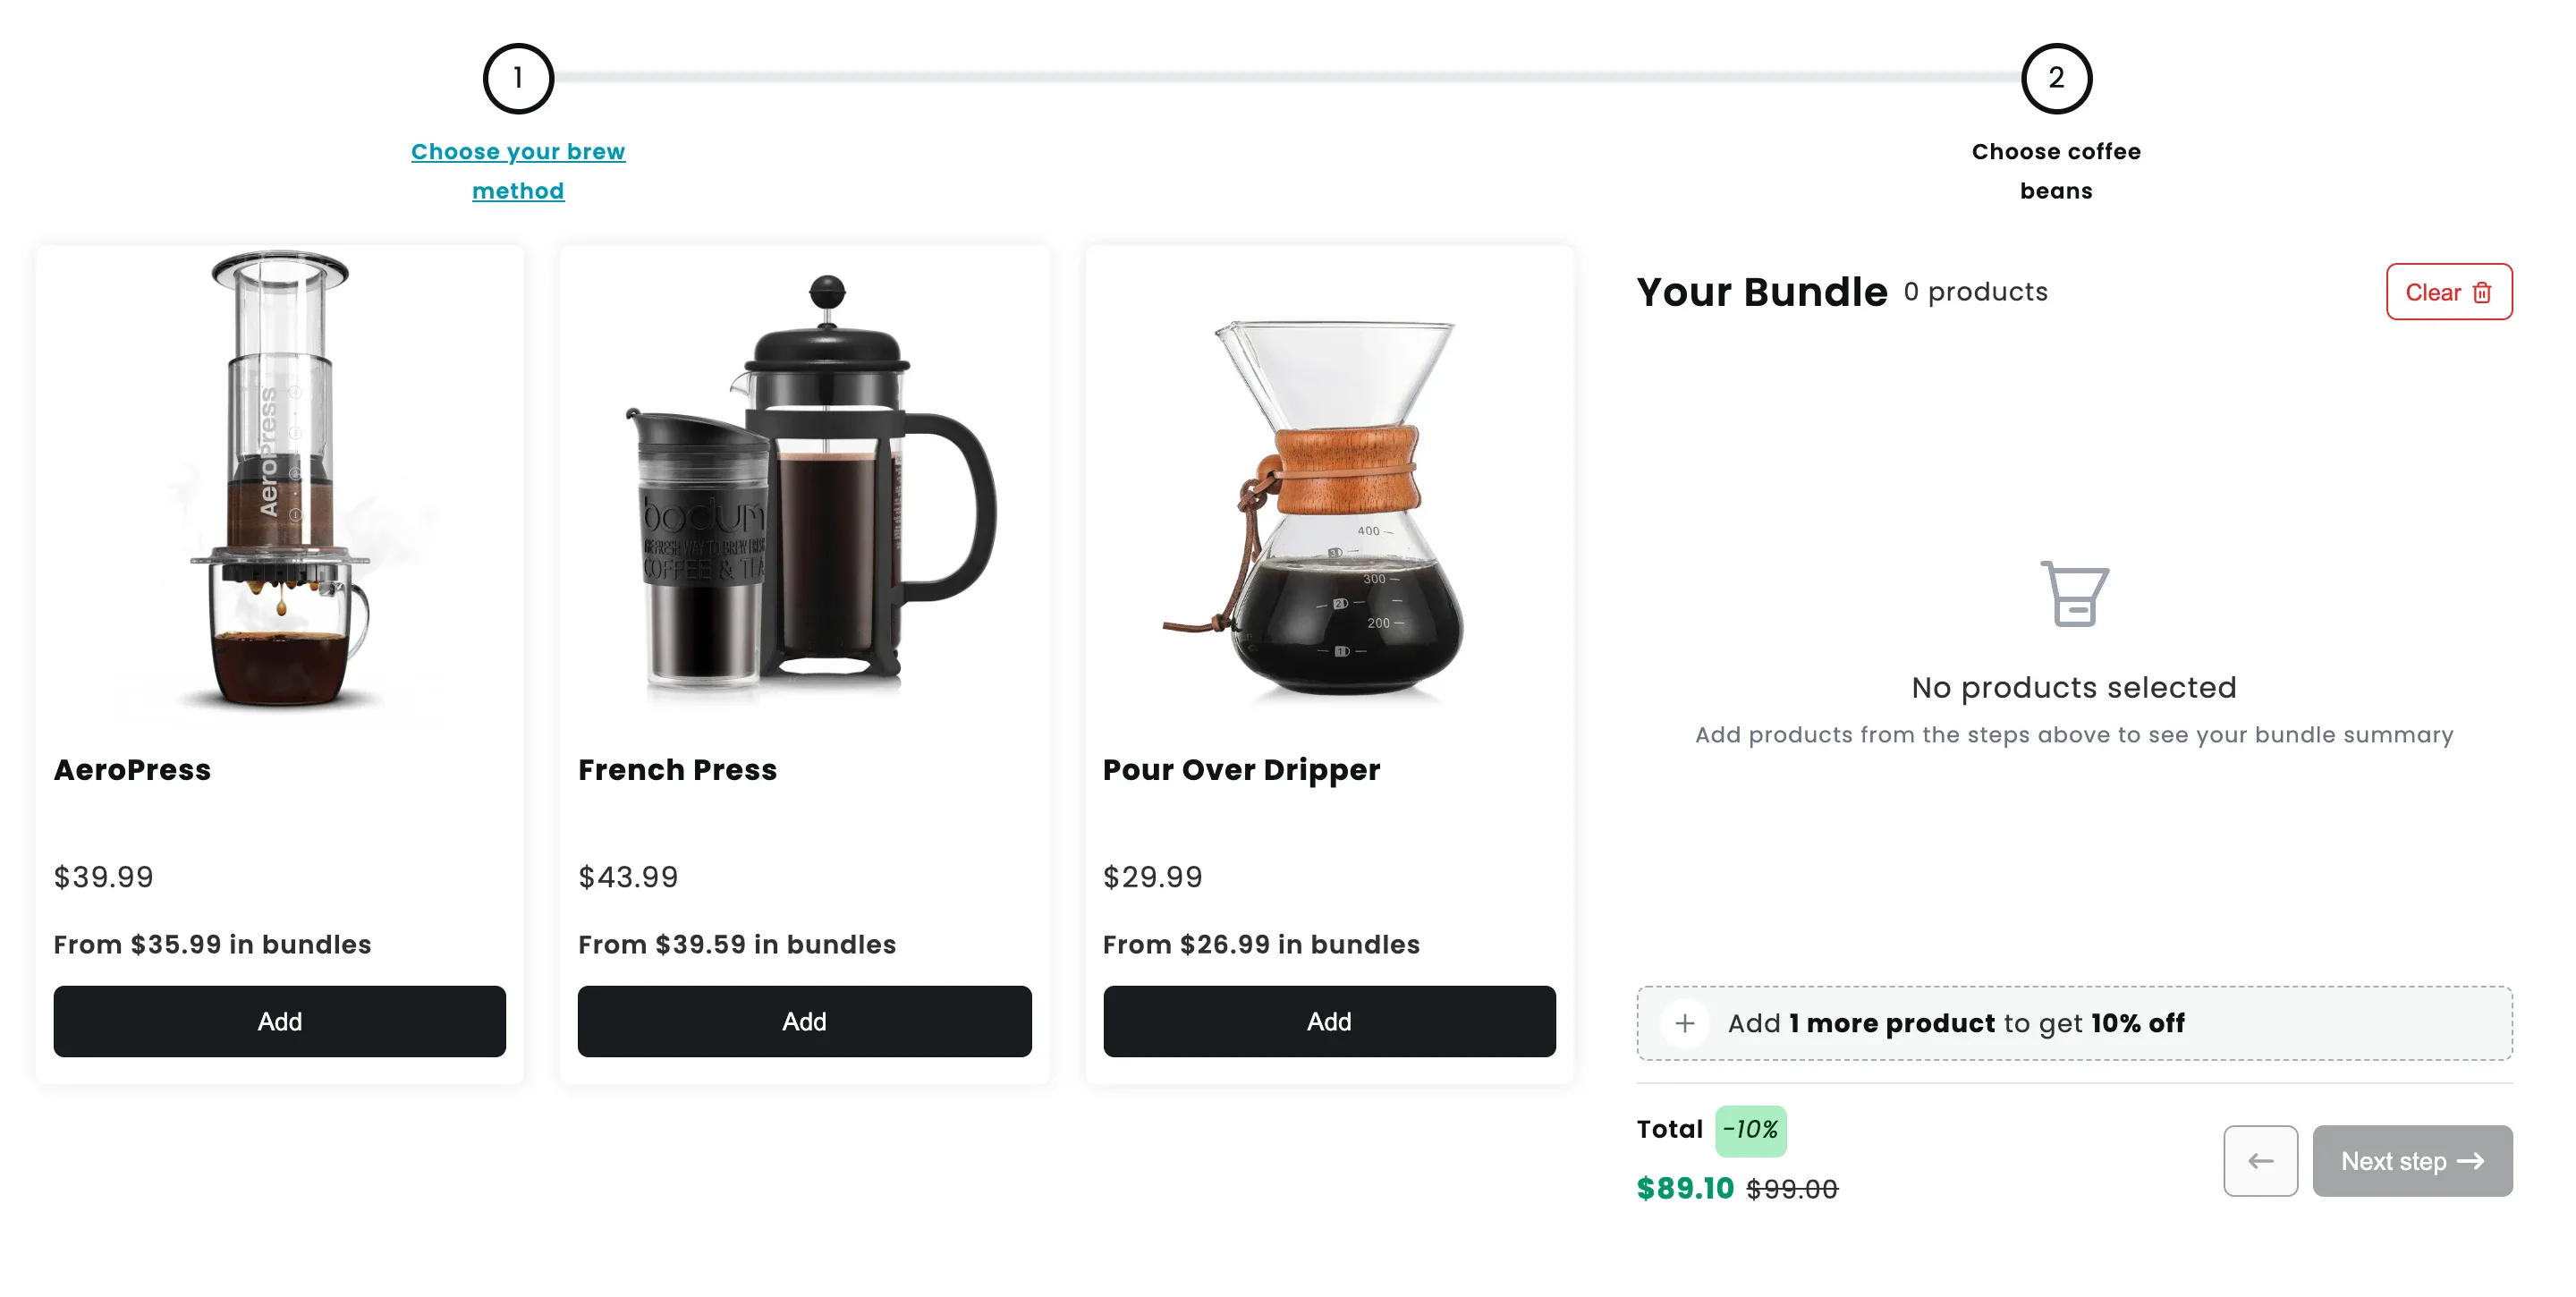
Here's the coffee kit from our demo store. On the first step, the shopper chooses a brewing method:
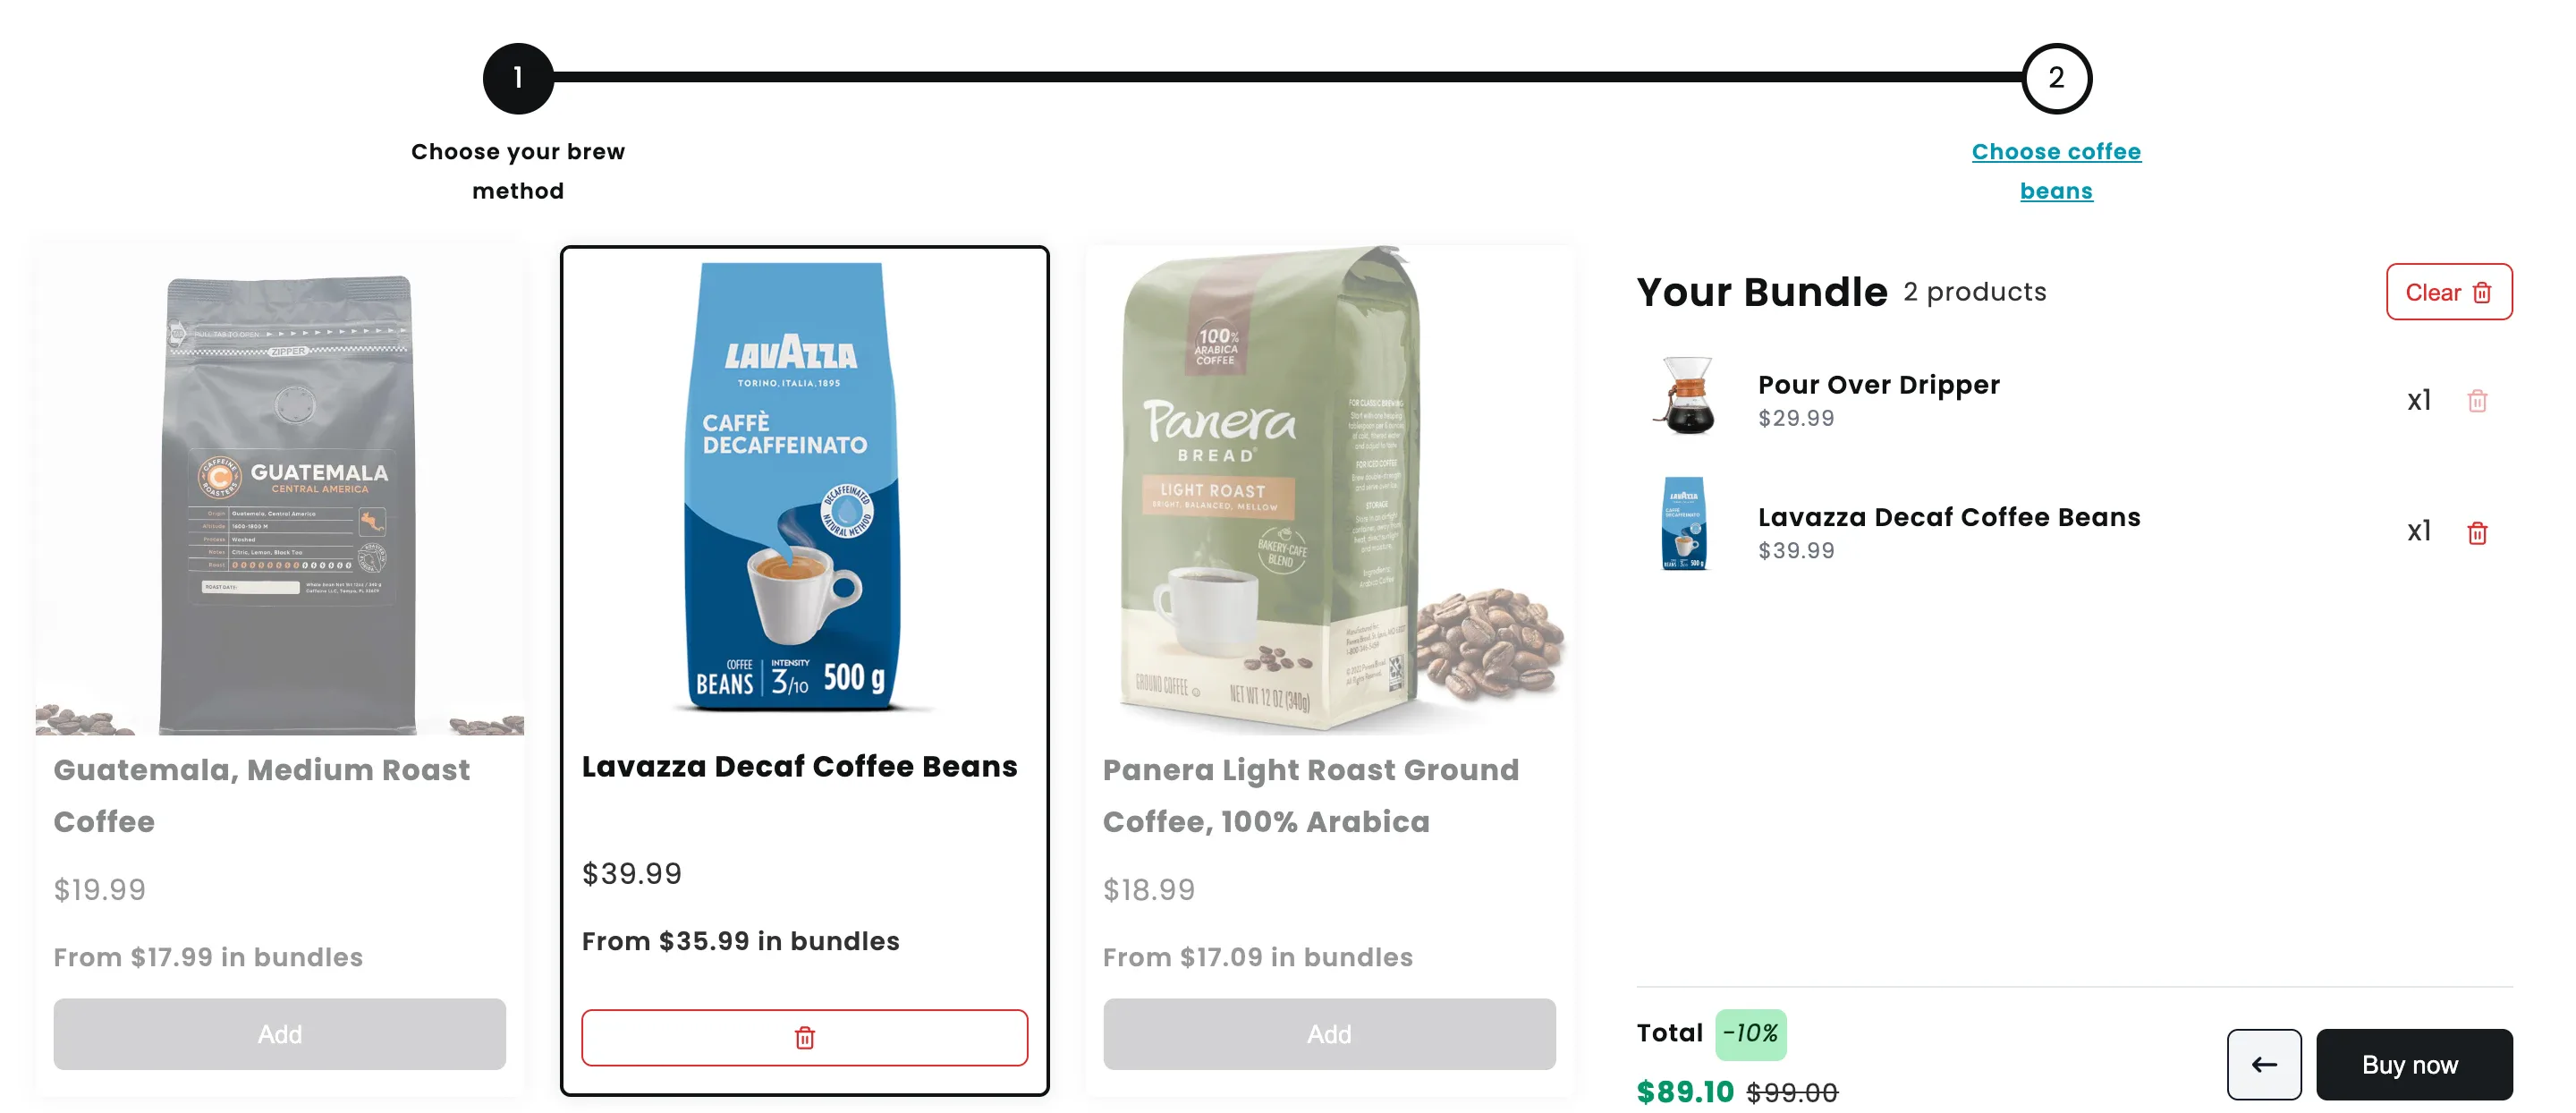
After picking the Pour Over Dripper and clicking next, step two asks for coffee beans. The "Your Bundle" panel on the right updates live with every pick, so the shopper always sees what's in the kit, the total, and the discount they're getting:
When they click Buy now, they go straight to checkout. The bundle shows up as one line, "Build Your At-Home Barista Kit", with each product listed underneath:
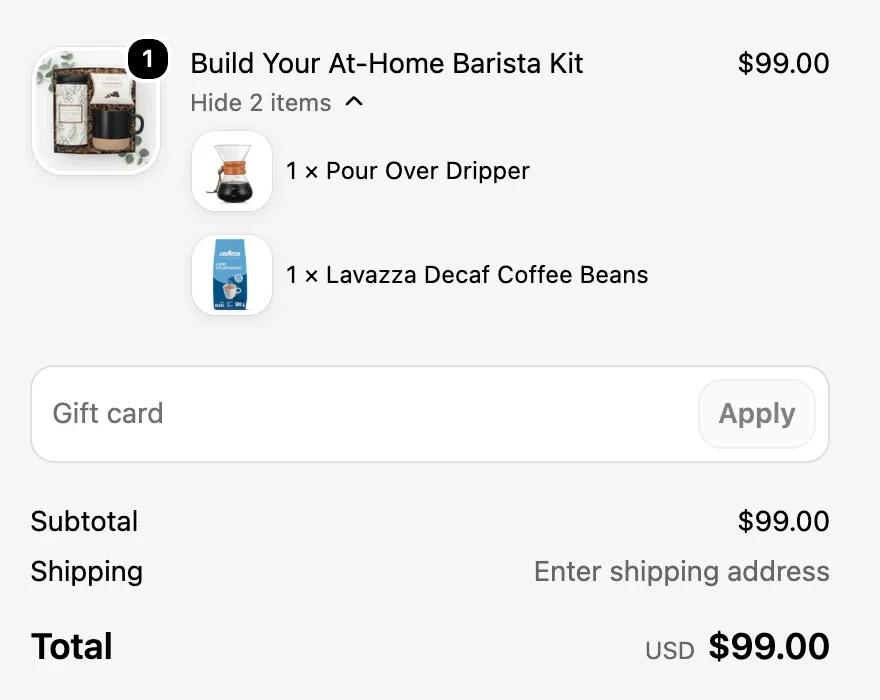
That last detail matters more than it looks. Every product in the bundle stays its own SKU, so Shopify deducts stock from the real products. That prevents overselling and the inventory headaches some bundling apps cause, and when the order comes in you see exactly which items to pick and ship.
Step-by-step bundles vs. build-your-own bundles
Step-by-step bundles are one of three common ways to sell products together. The right one depends on how much guidance your shoppers need.
| Step-by-step (guided) bundle | Build-your-own bundle | Fixed bundle | |
|---|---|---|---|
| How shoppers build it | One decision per step, in a set order | Pick any products from a single page | No choices, the set is predefined |
| Best for | Kits made of complementary parts | Mixing items from one range | Selling a proven combination |
| Example | Brewer, then beans | Any 3 candles | A gift set |
| In Shopify | NeatBundles Guided Bundle | NeatBundles Build Your Own Bundle | Shopify's free Bundles app |
If you're deciding between the first two, I wrote a separate guide on creating mix and match bundles, which covers the single-page version in detail.
Who should (and shouldn't) use step-by-step bundles?
Step-by-step bundles work best when your products answer a sequence of questions. They are not the right tool for every store, and choosing the wrong format adds clicks without adding sales.
They work well for:
- Coffee and tea: brewer, then beans or leaves, then an accessory
- Sports gear: board, then bindings, then boots
- Skincare routines: cleanser, then serum, then moisturizer
- Gift boxes: choose the box, then the items, then a card
- Starter kits for any hobby where beginners don't know what goes together
Choose something else when:
- Everything comes from one category. "Pick any 3 candles" doesn't need steps; a build-your-own bundle is faster.
- You want to reward quantity. "Buy 2, save 10%" is a volume discount, not a bundle builder.
- The set never changes. If every customer gets the same products, a fixed bundle is simpler.
How to create step-by-step product bundles in Shopify
Below is the exact setup from the video, done on a fresh store. I built a two-step snowboard bundle, but the steps are the same for any products.
Step 1 - Install NeatBundles
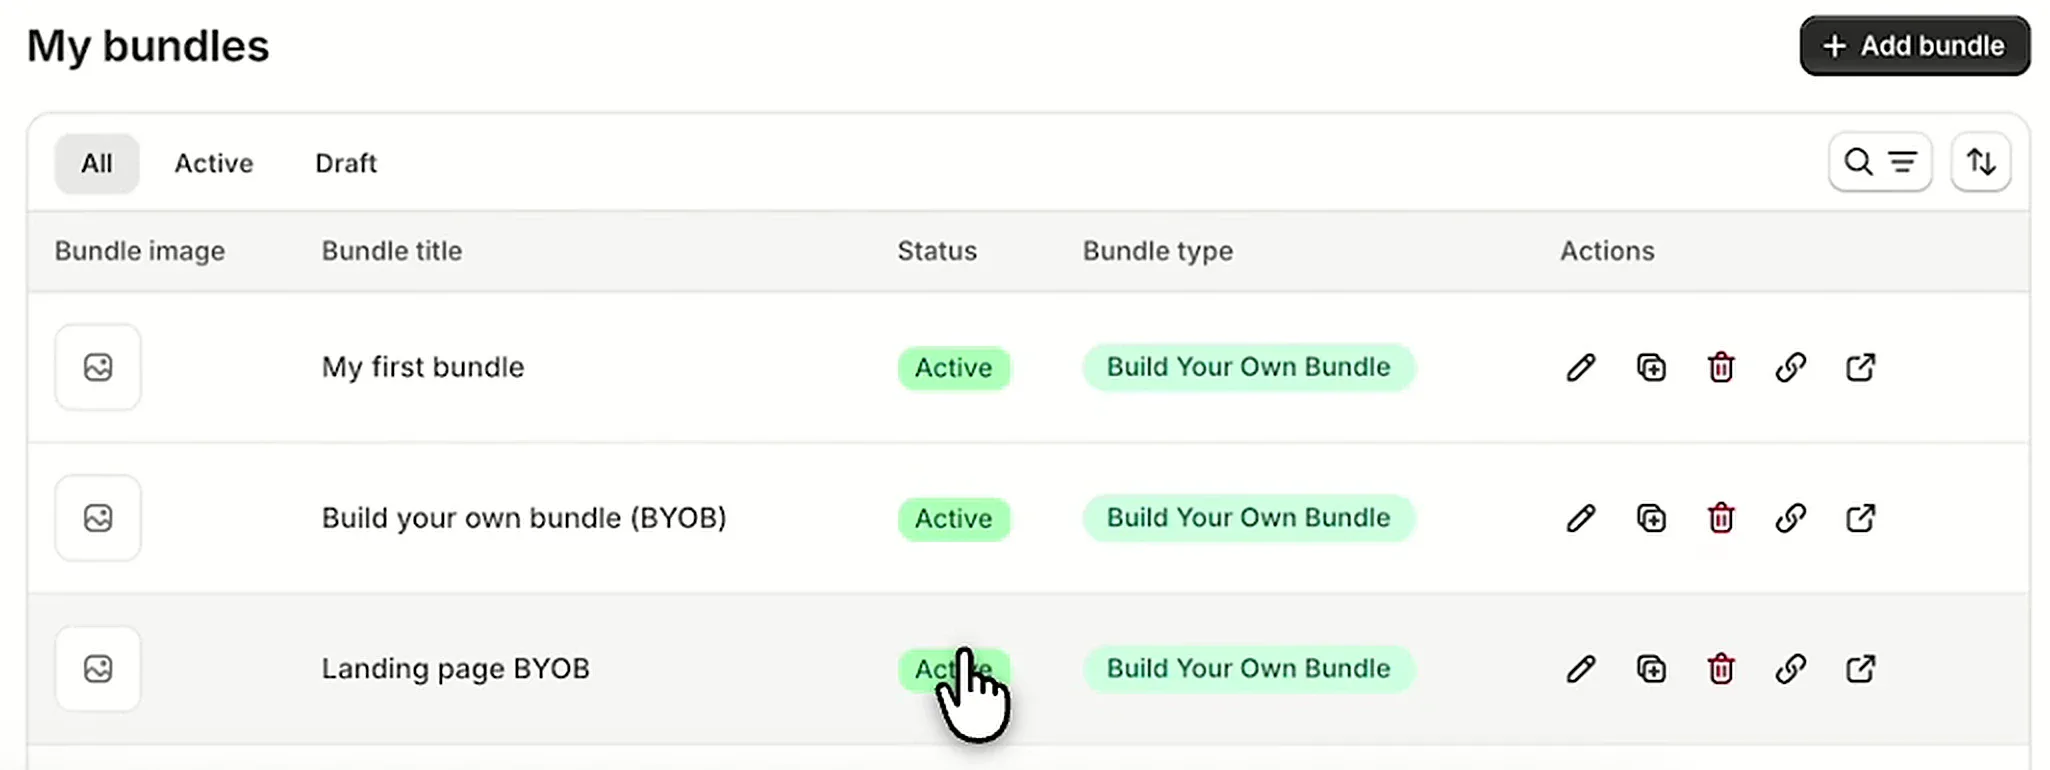
Start by installing NeatBundles from the Shopify App Store. After a short onboarding and the billing page, you land on the app's dashboard. Don't worry if your list is empty; mine has a few bundles from earlier tests, and they don't change anything in the setup.
Click Add bundle to start.
Step 2 - Choose the Guided Bundle type
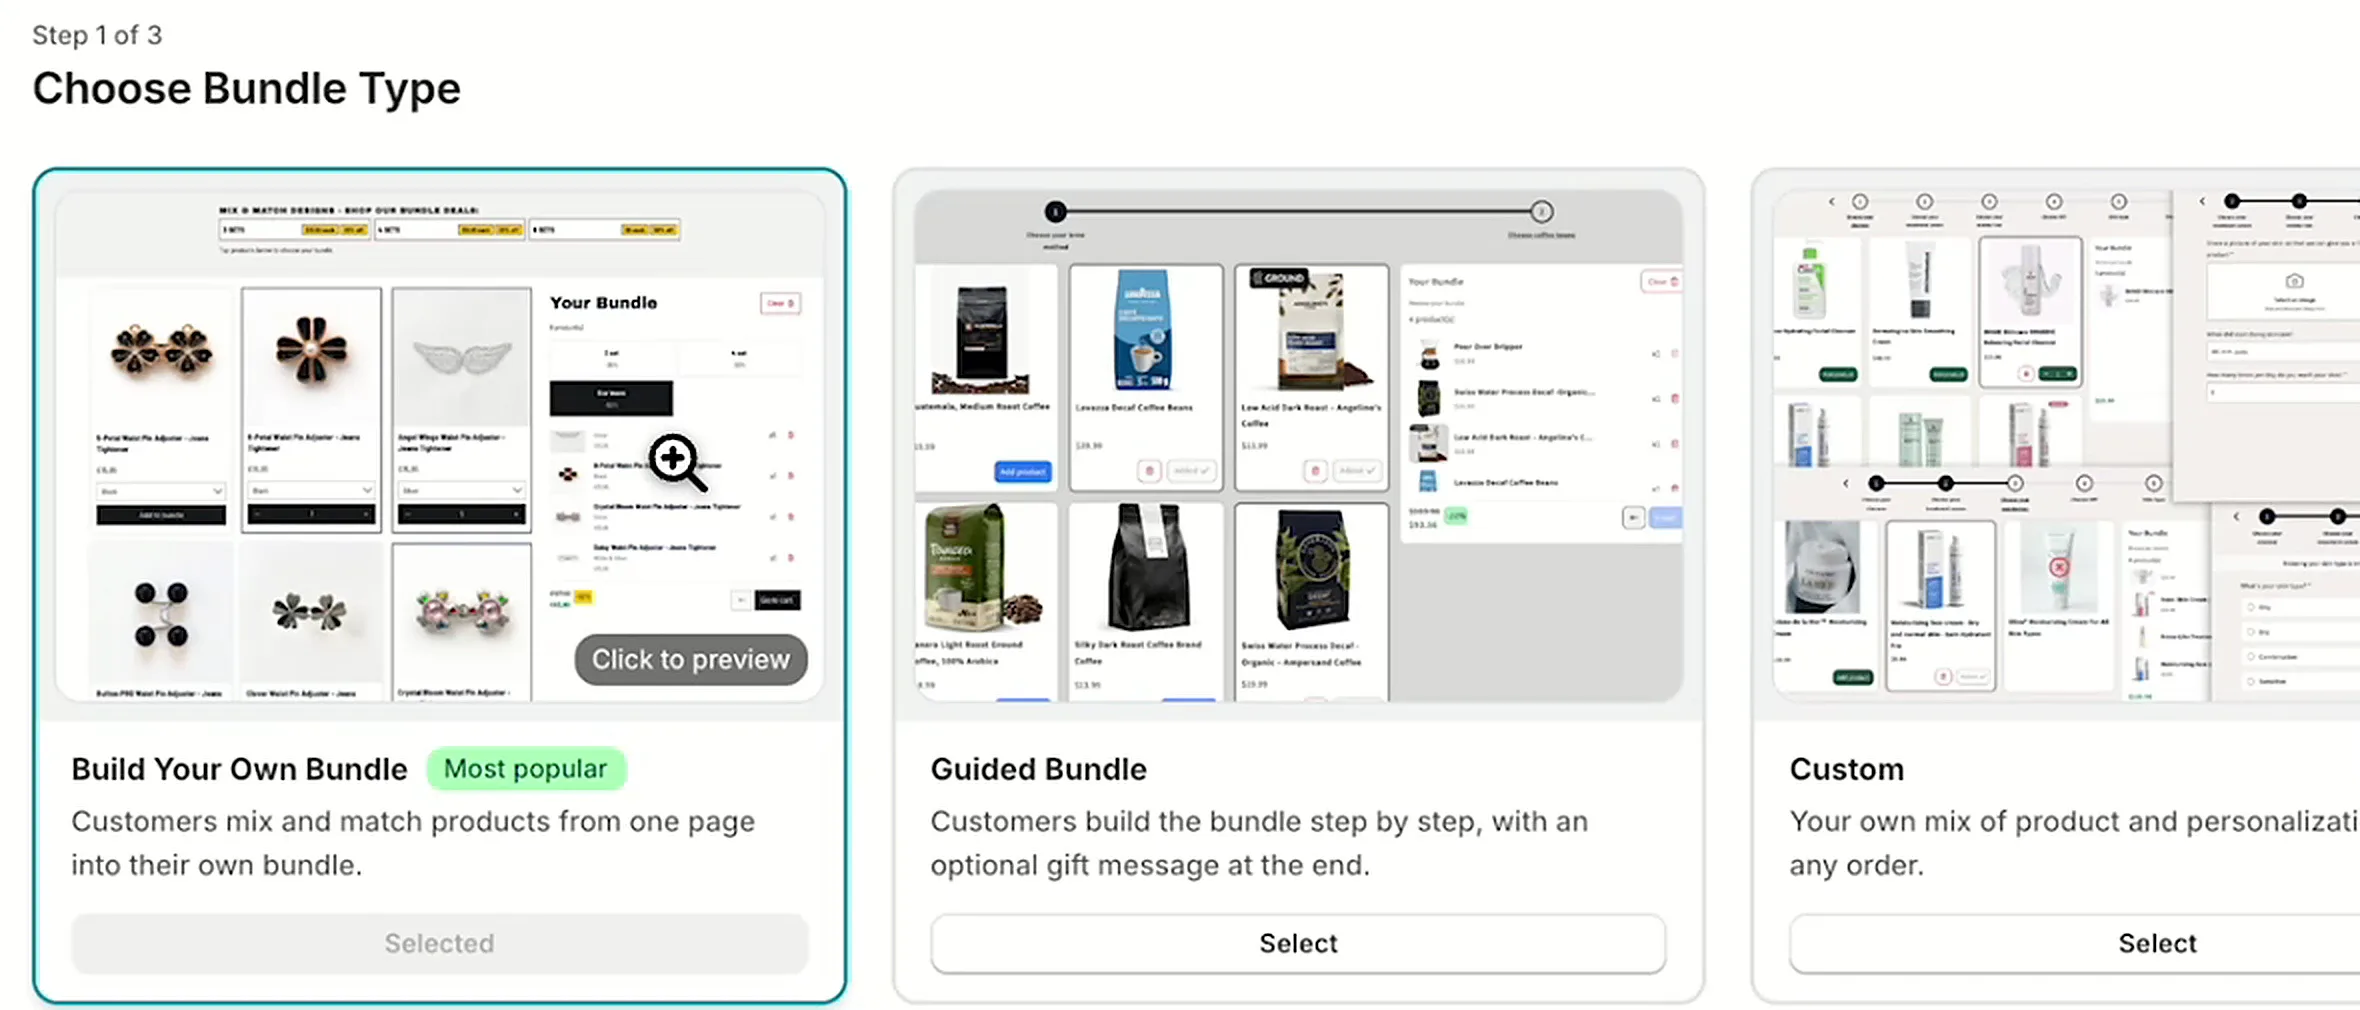
The first screen asks which kind of bundle you want. Build Your Own Bundle lets customers add products from one page. Guided Bundle is the step-by-step layout, described in the app as "Customers build the bundle step by step, with an optional gift message at the end."
Select Guided Bundle and click Next.
Step 3 - Name your bundle
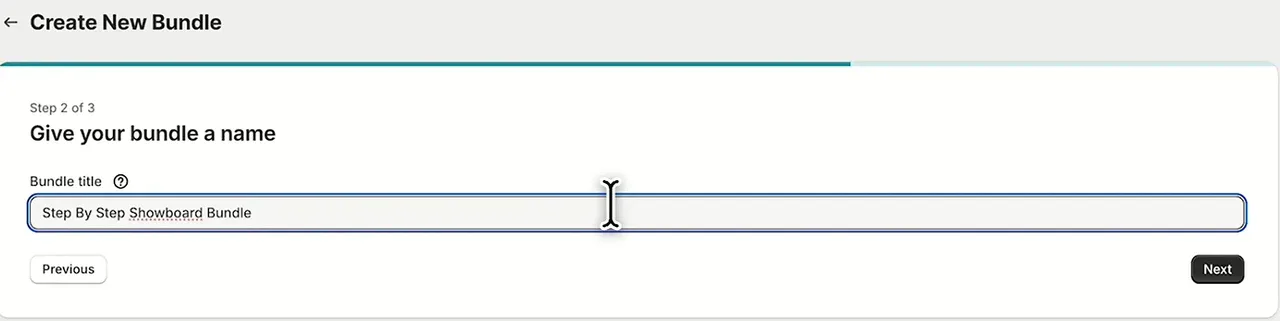
The bundle title is what customers see in the cart and at checkout, so give it a name that describes the offer, not an internal label. "Build Your At-Home Barista Kit" tells the shopper what they're getting; "Bundle 3" doesn't.
Tip: Stuck on a name? Ask ChatGPT for a few options based on the products in each step and the offer you're running.
Enter the title and click Next.
Step 4 - Set the bundle discount
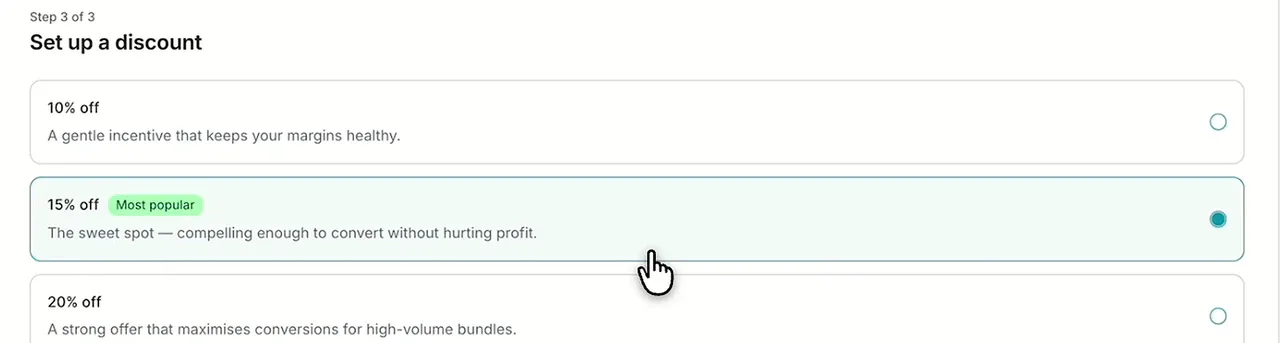
Pick a starting discount: 10%, 15% or 20%. I went with 15%, which the app marks as the most popular. You can change it at any time later, including switching to a fixed amount or no discount at all, so there's no need to agonize over it now. If you want more control over pricing, see how bundle discounts work.
Click Finish.
Step 5 - Add the first step and its products
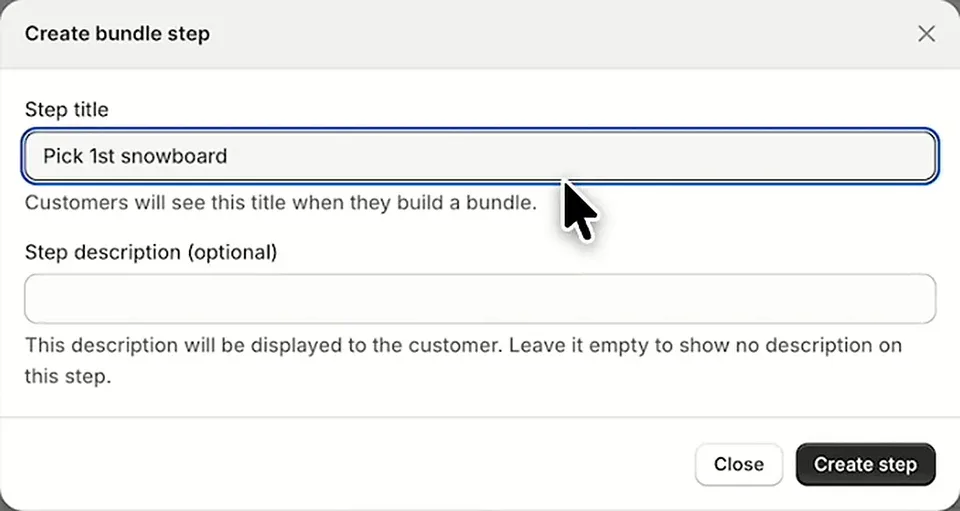
You're now on the bundle's settings page, where everything about how the bundle behaves lives. For now, we only need steps. Click Add step, give the step a title, and optionally a description. Customers see both while building the bundle, so write the title as an instruction: "Pick your first snowboard", "Choose your brew method".
Click Create step.
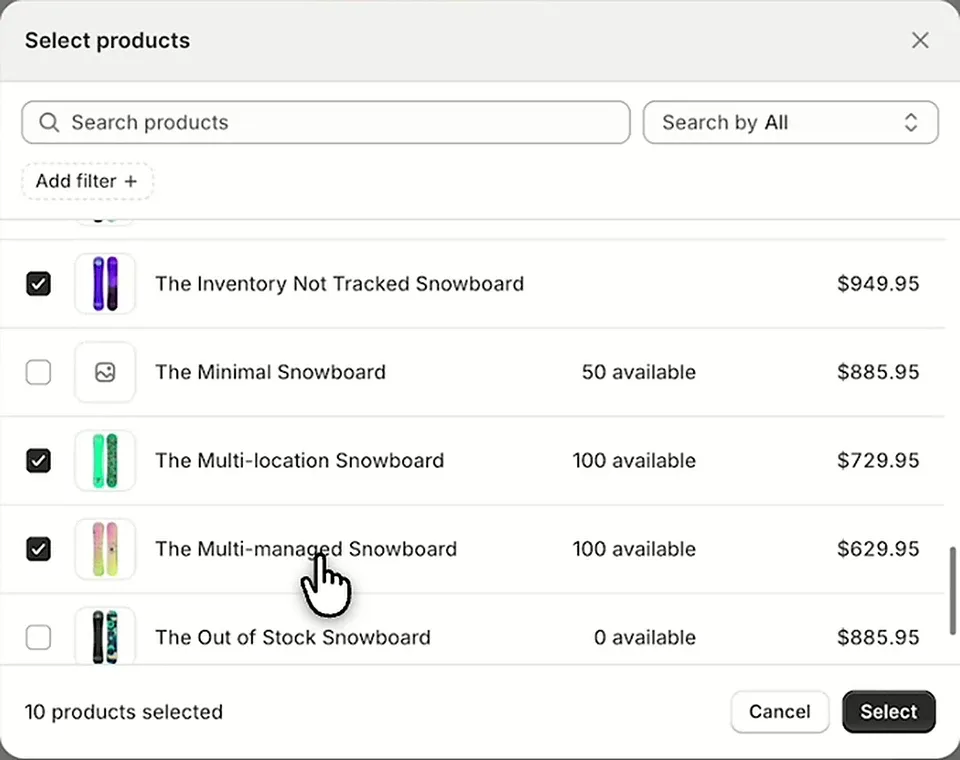
On the step page, click Select products and tick the products this step should offer. Only these products appear on this step of the storefront. Click Select, then Save.
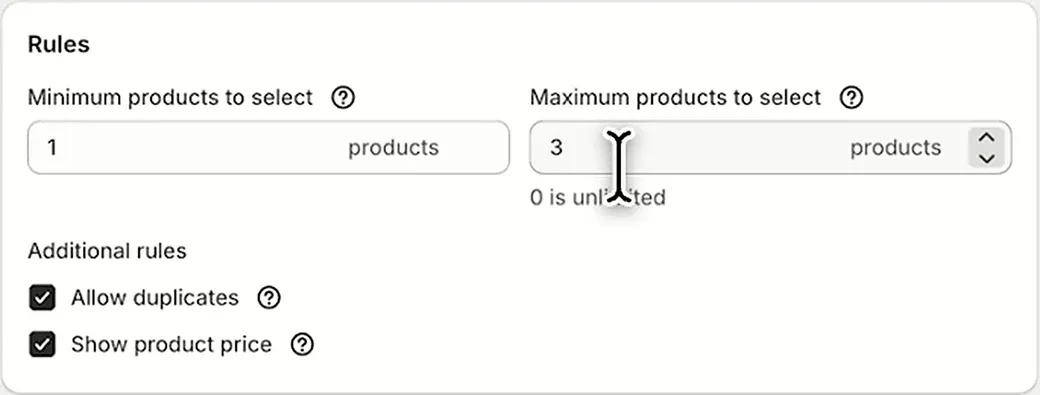
Further down the same page are the step's Rules. Minimum and maximum set how many products a shopper must pick on this step (0 means unlimited), and shoppers can't move to the next step until the minimum is met. You can also allow duplicates and choose whether product prices are shown.
Save and go back to the bundle.
Step 6 - Add the second step
Repeat the same process: Add step, enter a title, Create step, select the products for this step, and save. Back on the bundle page you'll now see both steps listed in order, along with the 15% discount from earlier. You can add as many steps as your bundle needs, and there's an option to include a personalization step at the end.
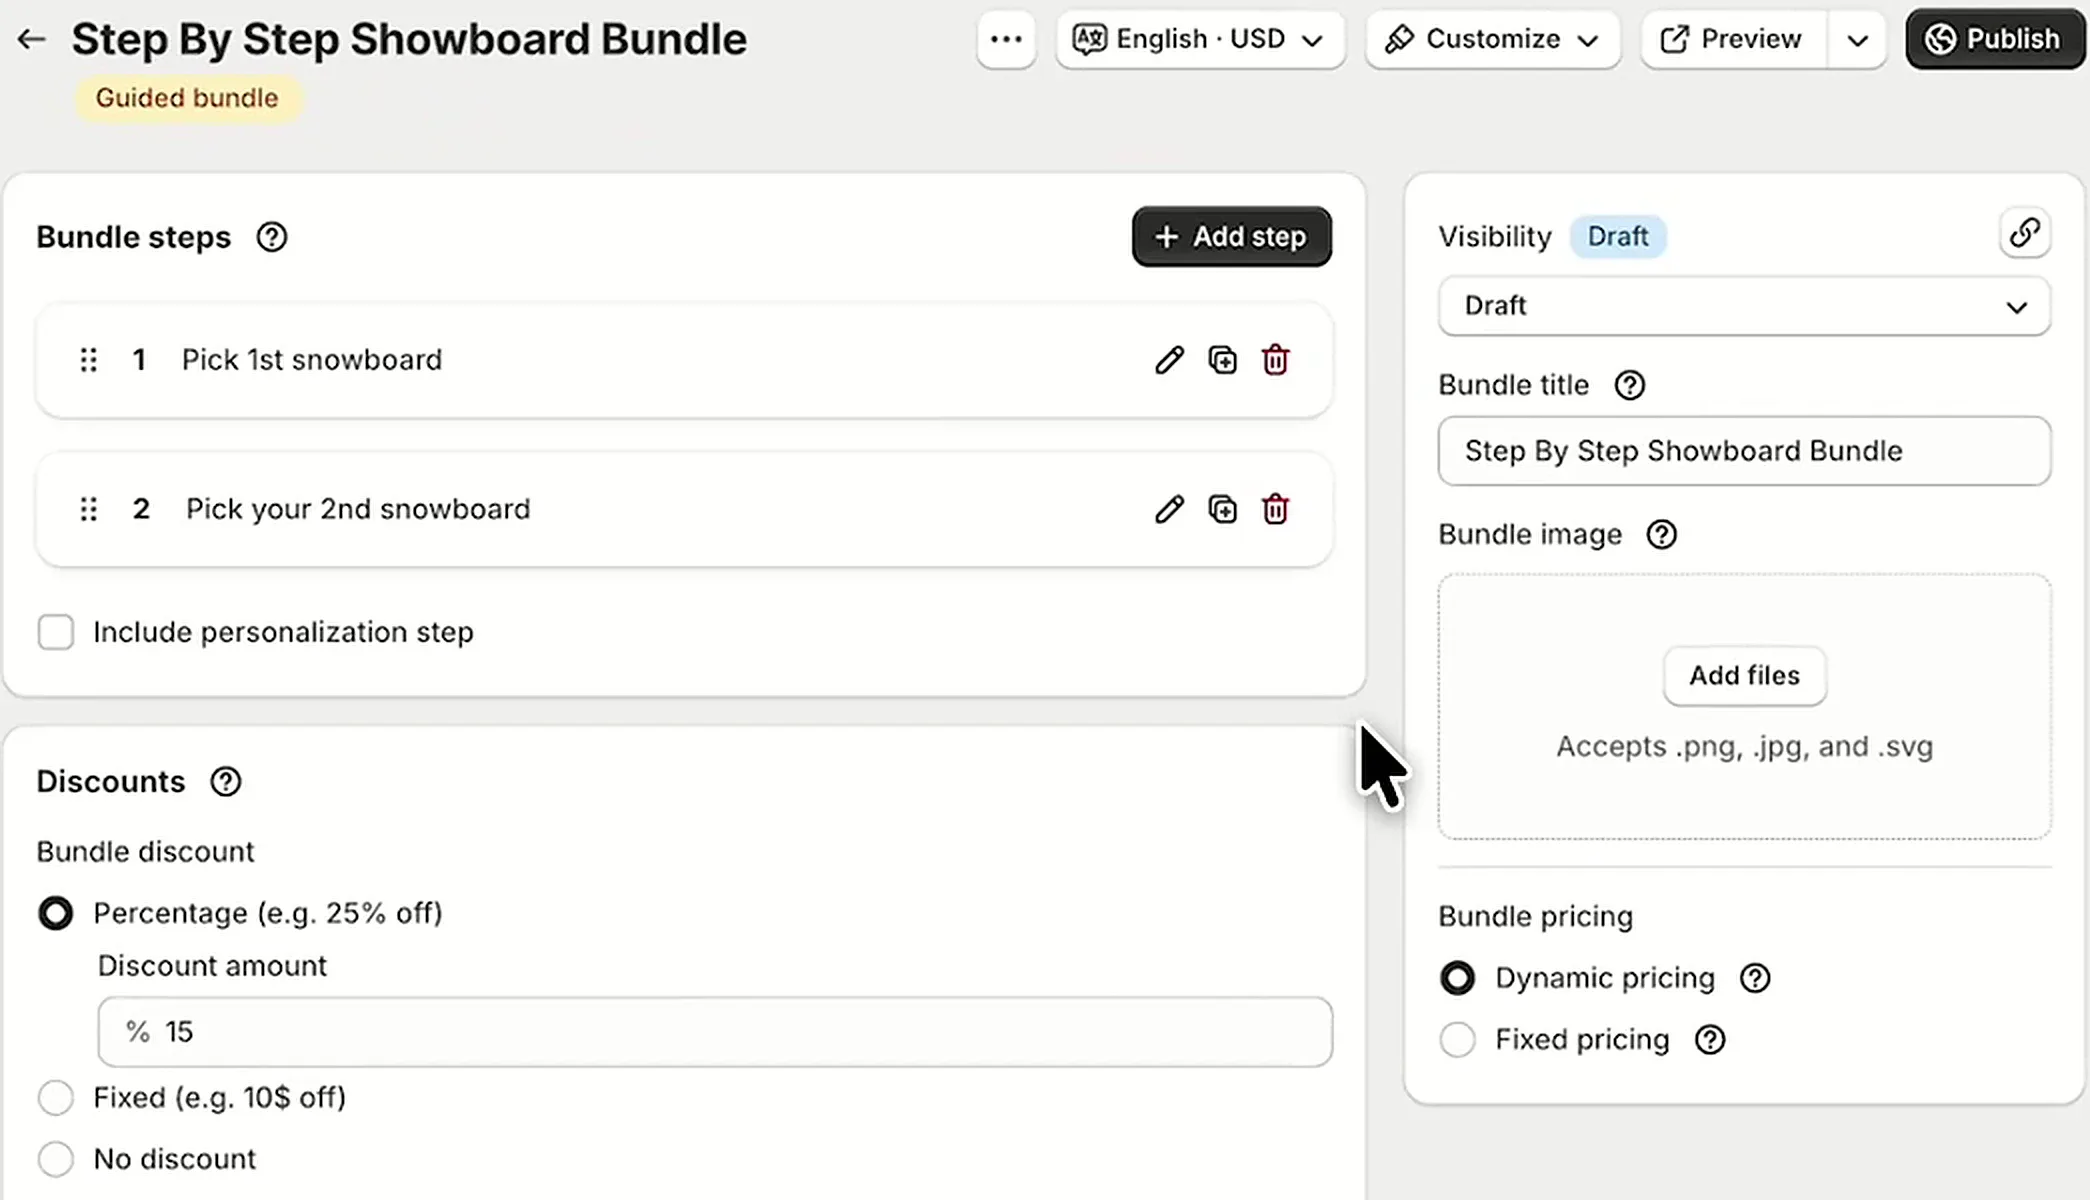
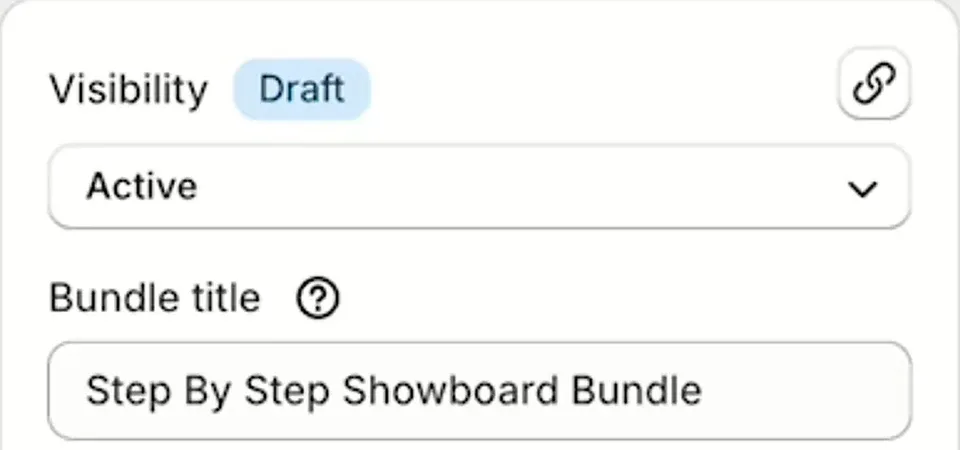
Step 7 - Switch the bundle from Draft to Active
Heads up: This is the step people miss. New bundles start as Draft, which means customers can't see them.
In the Visibility box, change Draft to Active and click Save.
Testing your step-by-step bundle on the storefront
Before you share the page, test it the way a customer would. Click View on storefront to open your new bundle page.
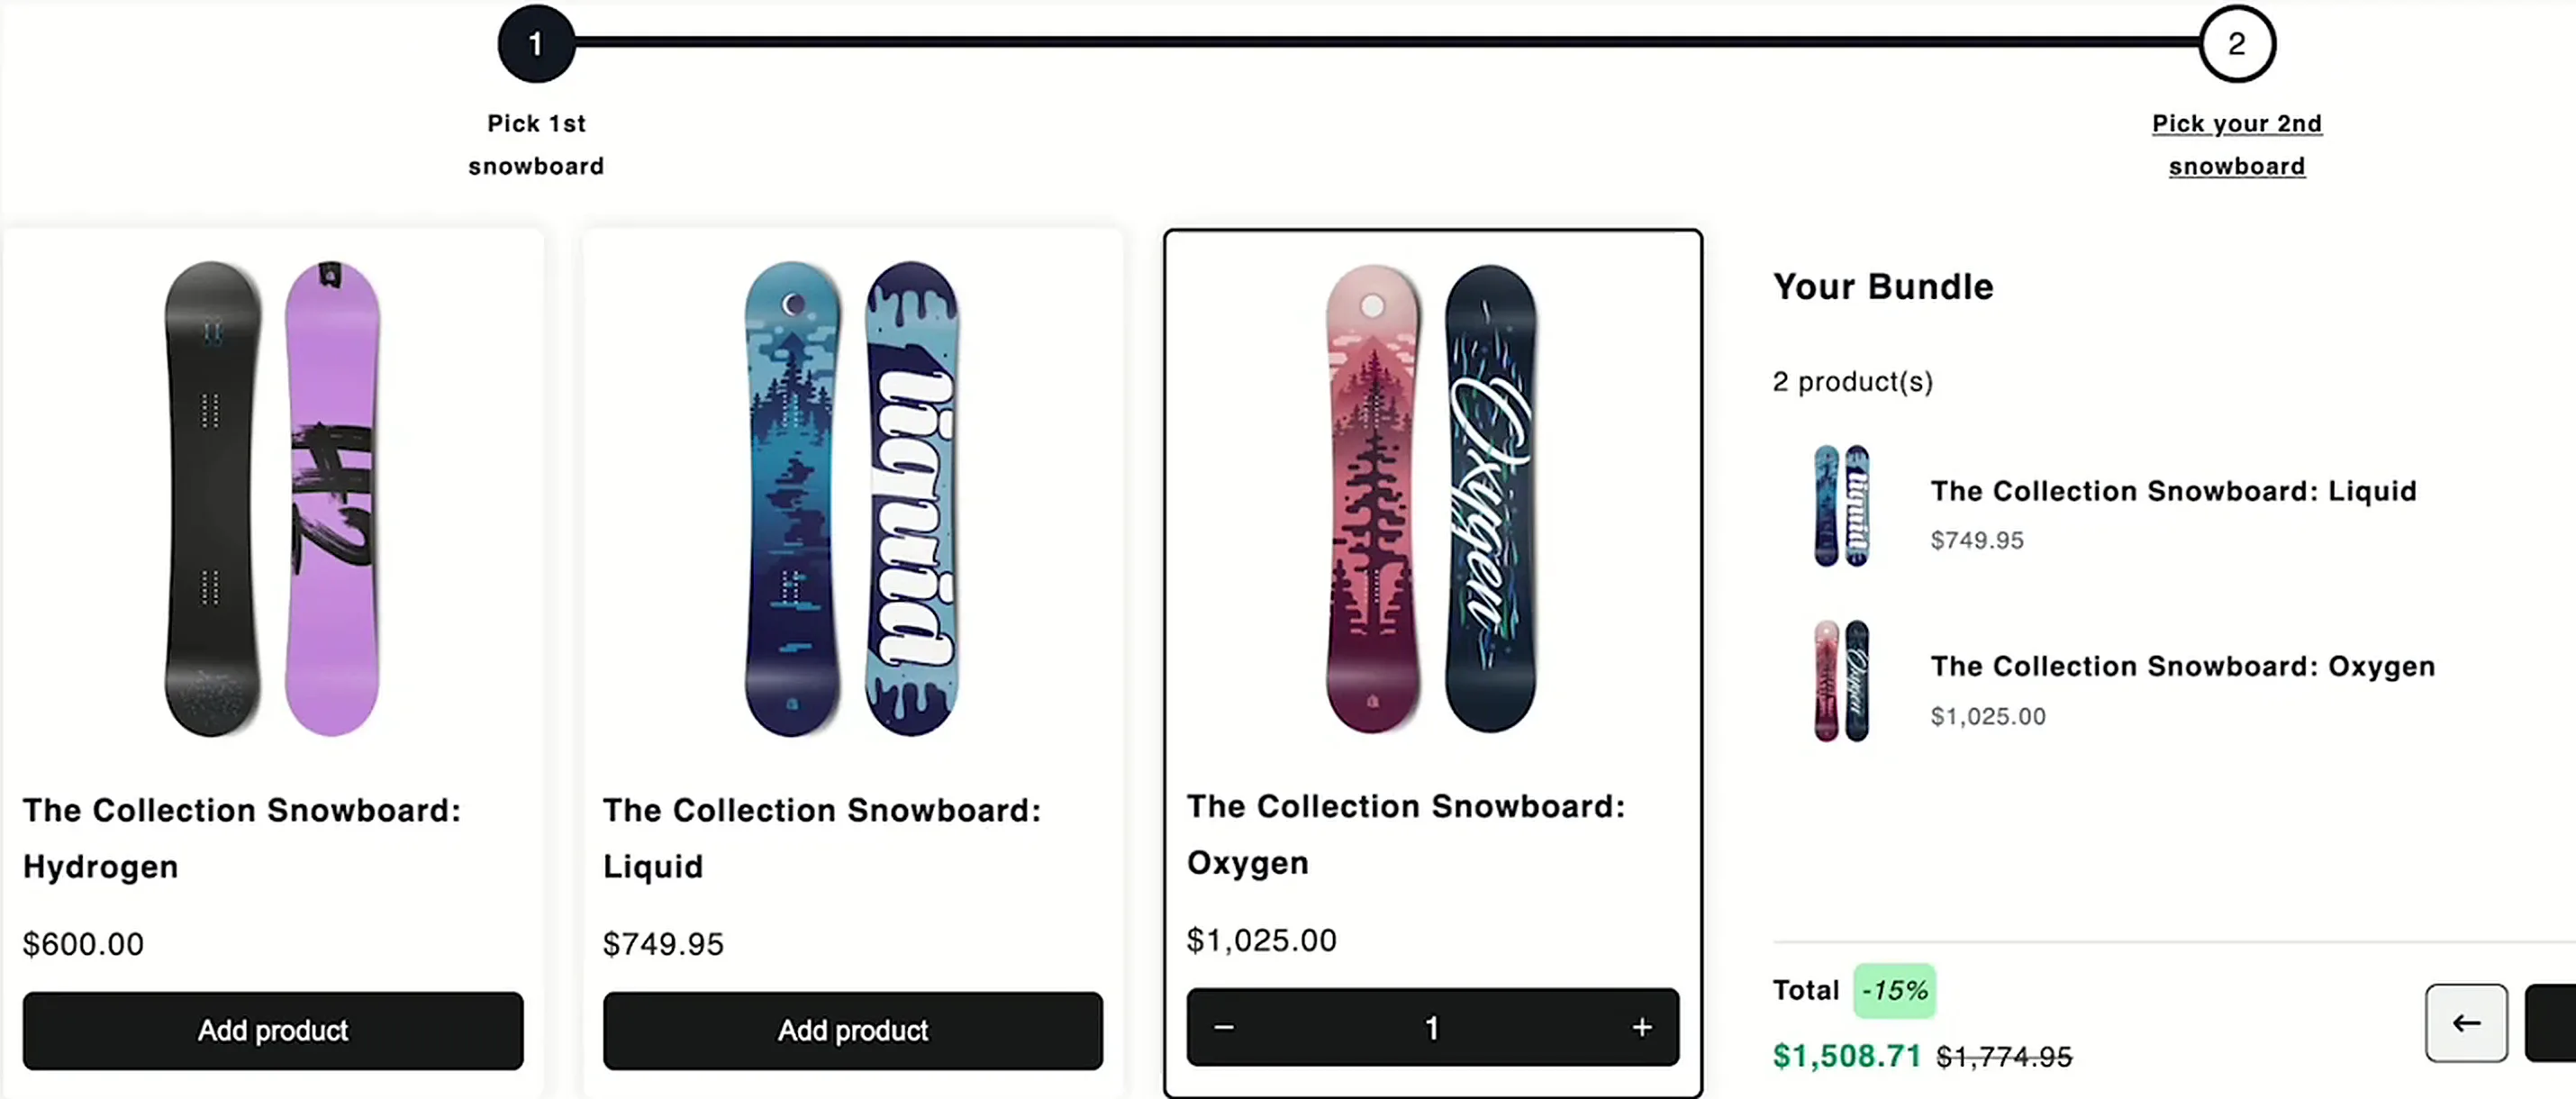
Pick a product on step one, click next, pick one on step two. The bundle summary should list both products, the total, the original price and the discount. In my test the two snowboards came to $1,508.71 instead of $1,774.95, with the 15% discount applied:
Click Buy now and you should land in checkout with the bundle as one line and every product listed under it, just like the coffee kit above. Placing a test order is worth it too: in the Shopify admin you'll see each product in the bundle as its own line item, ready to fulfil.
Tips and common mistakes
- Leaving the bundle in Draft. If your bundle page doesn't show up, check Visibility first. Draft bundles are invisible to customers.
- Using an internal name. The bundle title appears in the cart and at checkout. A descriptive name reassures shoppers they're buying what they built.
- Writing vague step titles. "Step 1" tells the shopper nothing. Phrase each step as the decision you want them to make.
- Skipping the step rules. Without a minimum, a shopper can breeze past a step. Set the minimum and maximum per step so every bundle comes out complete.
- Overthinking the discount. Start with a sensible default like 15% and adjust once you see how the bundle sells. You can change it any time.
- Not testing the full checkout. Build the bundle yourself on the storefront and go all the way to checkout before you promote the page.
Frequently asked questions
What is the difference between a step-by-step bundle and a build-your-own bundle?
A step-by-step bundle splits the choice into stages, with one decision per step in a fixed order, which suits kits made of complementary parts. A build-your-own bundle shows all eligible products on one page and lets the shopper pick freely, which suits mixing items from a single range.
Can I create step-by-step product bundles in Shopify without an app?
Not really. Shopify's free Bundles app handles fixed bundles, where the products are set in advance, but it doesn't offer a multi-step picker where shoppers choose one item per step. For that you need a bundle builder app such as NeatBundles, which needs no theme code.
How many steps can a step-by-step bundle have?
As many as the bundle needs. The example in this guide uses two steps, and longer flows such as a full skincare routine work the same way. Keep each step a single, clear decision so the bundle stays quick to complete, and add a personalization step at the end if you need one.
Does a step-by-step bundle keep Shopify inventory in sync?
Yes. Each product in the bundle remains its own SKU, so Shopify deducts stock from the actual products when an order comes in. Sold-out items can't be picked in the builder, which prevents overselling, and the order shows every item separately for fulfilment.
How much does NeatBundles cost?
NeatBundles is free to use up to $500 of bundle sales a month, which is plenty to set up your first step-by-step bundle and see how it performs. You can find the details on the pricing page.
Wrapping up
Step-by-step product bundles are one of the easiest ways to turn a single-item purchase into a full kit, and with a guided bundle you can set one up in a few minutes without touching your theme code. Install the app, choose Guided Bundle, add your steps and products, set a discount, and switch the bundle to Active.
If you'd like to see what other stores build, browse the bundle gallery for ideas, or read more about guided bundles. When you're ready, install NeatBundles for free and build your first step-by-step bundle today.